文章目录
- 一、效果预览
- 1.1 首页推荐图
- 1.2 菜谱智能识别页面
- 1.3 菜谱类别列表
- 1.4 步骤详情
- 二、需求背景
- 三、技术架构
- 3.1 系统整体架构图
- 3.2 系统技术栈
- 3.3 系统数据流转图
- 四、系统实现
- 4.1 小程序端功能实现
- 4.1.1 菜谱应用首页
- 4.1.2 菜谱识别功能页
- 4.1.3 菜谱制作详情页
- 4.2 Flask服务端功能实现
- 4.2.1 后端数据传输接口实现
- 4.2.2 调用识别接口功能实现
- 4.2.3 Python动态爬虫实现
- 五、拓展阅读
一、效果预览
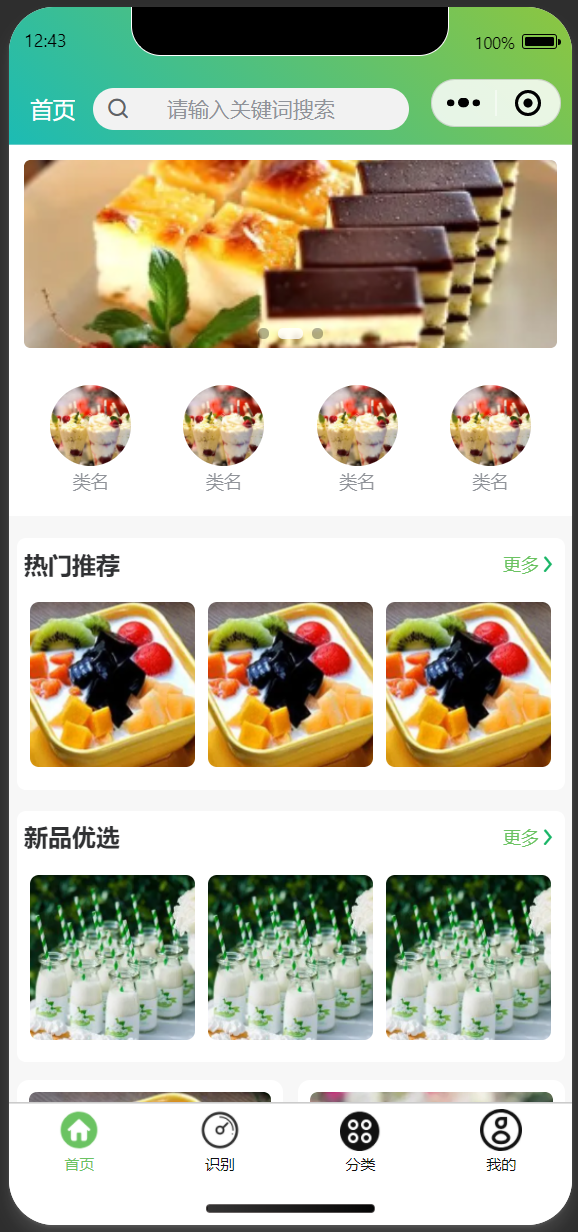
1.1 首页推荐图
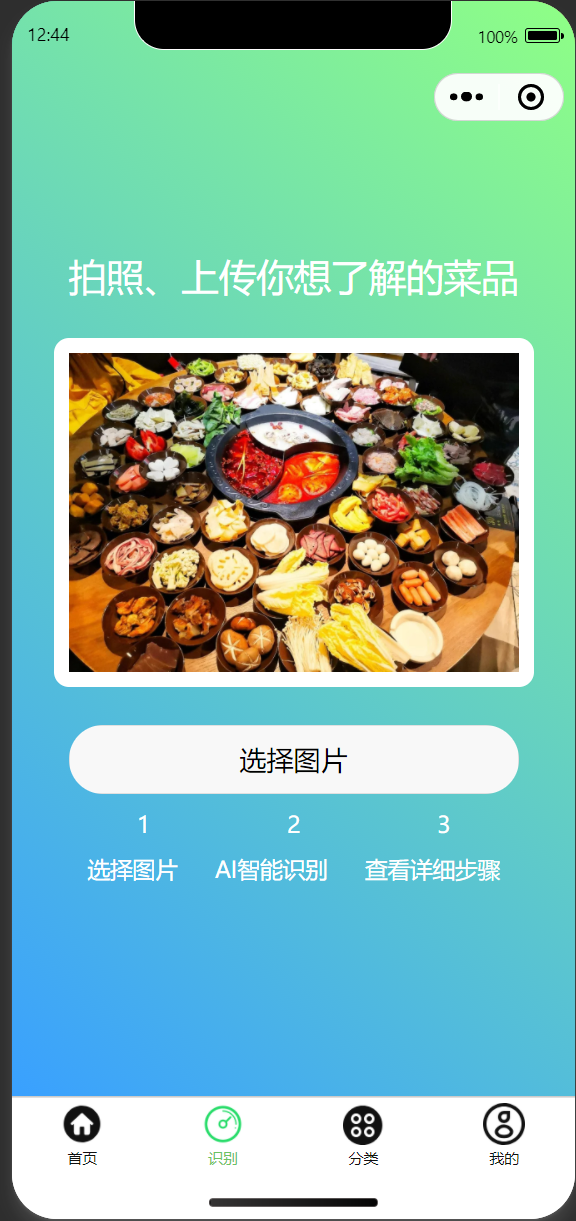
1.2 菜谱智能识别页面
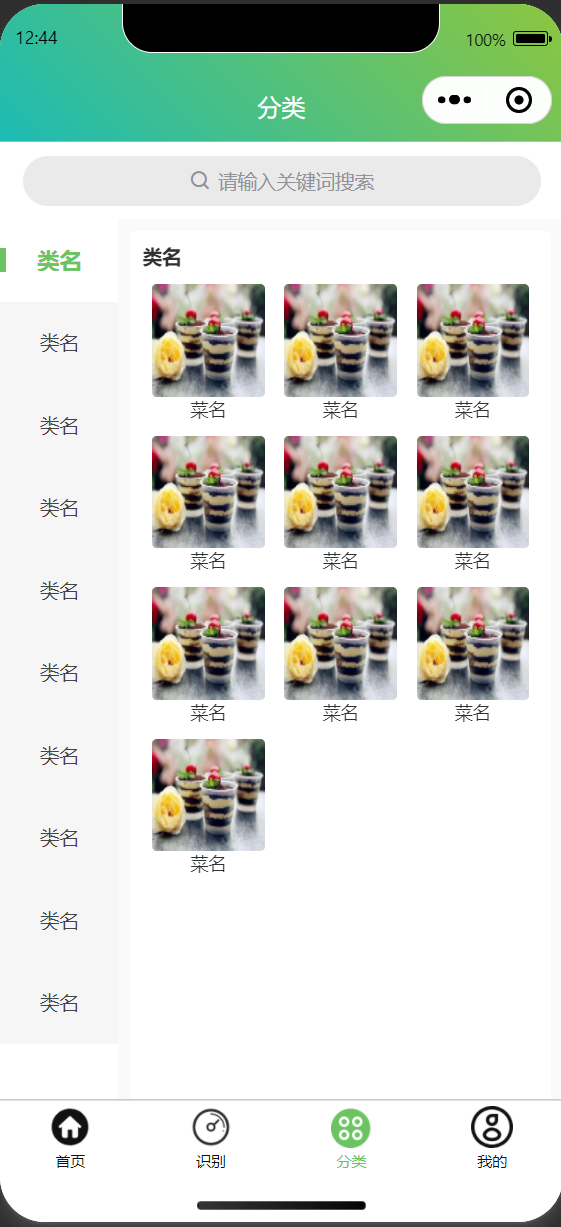
1.3 菜谱类别列表
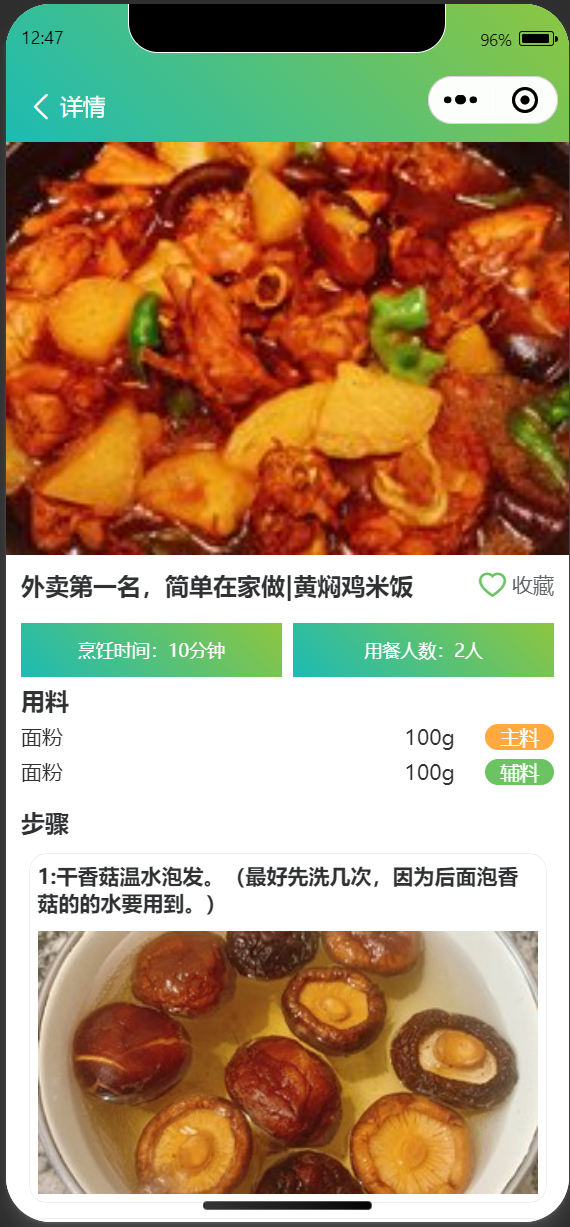
1.4 步骤详情
二、需求背景
每次去饭店吃好吃的,你有没有遇到过一两个让你觉得很想学会做的菜品,这个时候又不好直接去问厨师,又奈何自己的手艺不行!
所以,就算我们不知道,但我们总会有办法知道,于是我选择让AI这位大厨告诉我!
直接通过拍照识别你想要知道的菜品,就能知道其制作的全流程!直接省去了自己去“下厨房”这一类平台搜索并学习的过程!直接用ai帮你解决全流程!
三、技术架构
在开始介绍本项目的具体实现流程之前,我么先对整个项目的技术栈、项目架构、以及项目的数据流进行熟悉。
3.1 系统整体架构图
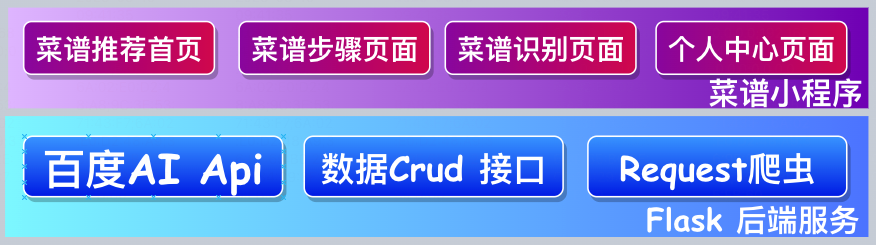
3.2 系统技术栈
| 前端 | 后端 |
|---|---|
| - 语言:vue 2.0 | - 框架 : uni-app | - UI组件: uview | - 语言:python | - 框架: Flask |
3.3 系统数据流转图
本项目的数据流转主要,从小程序端到百度SDK接口端,详细过程如下所示:

四、系统实现
4.1 小程序端功能实现
4.1.1 菜谱应用首页
页面采用了手机端常用的经典Flex布局,结合Uview组件进行编排。直接上代码:
<template>
	<view>
		<u-navbar back-text="首页" backIconName=" " :backTextStyle="{color:'#ffffff'}" :customBack="back" :background="background" titleColor="#fff">
			<view class="search-wrap" @click="toSearch">
				<u-search height="56" inputAlign="center" placeholder="请输入关键词搜索" :searchIconStyle="searchIconStyle" :showAction="false"></u-search>
			</view>
		</u-navbar>
		<view class="home u-p-b-0">
			<u-swiper :list="swiperList"></u-swiper>
			<view class="u-m-t-20">
				<u-grid :col="4" :border="false">
					<u-grid-item v-for="(item,index) in 4" :key="index" @click="$common.navigateTo('/pages/index/list')">
						<u-image :src="categoryimg" borderRadius="50%" width="108" height="108"></u-image>
						<view class="grid-text">类名</view>
					</u-grid-item>
				</u-grid>
			</view>
		</view>
		<view class="box u-p-t-30">
			<view class="box-side">
				<view class="u-flex u-row-between">
					<view class="title-blod">热门推荐</view>
					<view class="title-more">更多<u-icon name="arrow-right" color="#18B566" size="24"></u-icon>
					</view>
				</view>
				<view class="">
					<u-grid :col="3" :border="false">
						<u-grid-item v-for="(item,index) in 3" :key="index">
							<u-image width="220" height="220" :src="hotimg" borderRadius="12"></u-image>
						</u-grid-item>
					</u-grid>
				</view>
			</view>
		</view>
		<view class="box">
			<view class="box-side">
				<view class="u-flex u-row-between">
					<view class="title-blod">新品优选</view>
					<view class="title-more">更多<u-icon name="arrow-right" color="#18B566" size="24"></u-icon>
					</view>
				</view>
				<view class="">
					<u-grid :col="3" :border="false">
						<u-grid-item v-for="(item,index) in 3" :key="index">
							<u-image width="220" height="220" :src="newimg" borderRadius="12"></u-image>
						</u-grid-item>
					</u-grid>
				</view>
			</view>
		</view>
		<!-- list -->
		<water :list="flowList"></water>
		<!-- top s -->
		<u-back-top :scrollTop="scrollTop" mode="circle" bottom="200" right="40" top="600" :icon="icon"
			:icon-style="iconStyle" :tips="tips" :custom-style="customStyle">
		</u-back-top>
	</view>
</template>

<script>
	import water from '@/components/water';
	export default {
		components:{water},
		data() {
			return {
				background: {
					'background-image': 'linear-gradient(45deg, rgb(28, 187, 180), rgb(141, 198, 63))'
				},
				searchIconStyle: {
					'display': 'none'
				},
				swiperList: [
					{image:'/static/banner1.jpg'},
					{image:'/static/banner2.jpg'},
					{image:'/static/banner3.jpg'},
				],
				flowList: [],
				page: 1,
				is_loading: true,
				scrollTop: 0,
				icon: 'arrow-up',
				iconStyle: {
					color: '#ffffff',
					fontSize: '30rpx'
				},
				tips: '顶部',
				customStyle: {
					backgroundColor: '#6BC362',
					color: '#ffffff'
				},
				list:[
					{image:'/static/pic.jpg'},
					{image:'/static/pic2.jpg'},
					{image:'/static/pic3.jpg'},
					{image:'/static/pic4.jpg'},
				],
				hotimg: '/static/pic2.jpg',
				newimg: '/static/pic4.jpg',
				categoryimg: '/static/pic3.jpg'
			}
		},
		onLoad() {
			this.addRandomData()
		},
		methods: {
			toSearch(){
				this.$common.navigateTo('/pages/index/search')
			},
			addRandomData() {
				for (let i = 0; i < 10; i++) {
					let index = this.$u.random(0, this.list.length - 1);
					// 先转成字符串再转成对象,避免数组对象引用导致数据混乱
					let item = JSON.parse(JSON.stringify(this.list[index]));
					item.id = this.$u.guid();
					this.flowList.push(item);
				}
			},
			onReachBottom() {
				if (this.is_loading) {
					this.page++;
					this.addRandomData();
				}
			},
			// top
			onPageScroll(e) {
				this.scrollTop = e.scrollTop;
			},
			back() { // 首页
				uni.navigateBack({
					delta: 2
				})
			},
		}
	}
</script>

<style lang="scss" scoped>
	.grid-text {
		font-size: 24rpx;
		margin-top: 4rpx;
		color: $u-type-info;
	}
	.search-wrap {
		margin: 0 30rpx 0 10rpx;
		flex: 1;
	}

	.box{
		background-color: #f7f7f7;
		padding: 15rpx 10rpx;
		.box-side{
			background-color: #fff;
			padding: 15rpx 10rpx 0 10rpx;
			border-radius: 12rpx;
		}
	}
</style>
4.1.2 菜谱识别功能页
这一页的主要功能在于给用户一个上传菜品照片或者拍照的接口,同时放回系统的识别结果:
<template>
	<view class="content">
		<text class="slogan">拍照、上传你想了解的菜品</text>
		<image class="image" :src="imageSrc" mode="widthFix"></image>
		<button type="default" class="getBtn" @tap="upload">选择图片</button>
		<view class="text-area">
			<text class="title">1</text>
			<text class="title">2</text>
			<text class="title">3</text>
		</view>
		<view class="text-area">
			<text class="title">选择图片</text>
			<text class="title">AI智能识别</text>
			<text class="title">查看详细步骤</text>
		</view>

		<wyb-popup ref="popup" type="bottom" height="400" width="500" radius="6" :showCloseIcon="true">
		    <view class="popup-content">
		          <hm-cover-card :options="options"></hm-cover-card>
		    </view>
		</wyb-popup>
	</view>
</template>

<script>
	import process from '@/utils/QueryResult.js'
	import HmCoverCard from '@/components/hm-cover-card/index.vue'
	import wybPopup from '@/components/wyb-popup/wyb-popup.vue'

	import {
		pathToBase64
	} from '@/js_sdk/mmmm-image-tools/index.js'

	export default {
		data() {
			return {
				title: 'Hello',
				imageSrc: '/static/hotpot.jpeg',
				hash: null,
				  options: {
				          entryPic:
				            '/static/hm-cover-card/images/img_25361_0_1.png',
				          title: '单色摄影',
				          text: '456张风景照片',
				          shoucang:
				            '/static/hm-cover-card/images/img_25361_0_0.png'
				        }
			}
		},
		components: {
		    wybPopup,
			HmCoverCard
		},
		onLoad() {

		},
		methods: {
			upload() {
				let _this = this;
				uni.chooseImage({
					count: 1, //默认9
					sizeType: ['original', 'compressed'], //可以指定是原图还是压缩图,默认二者都有
					sourceType: ['album'], //从相册选择
					success: function(res) {
						uni.showLoading({
							title: "AI努力识别中"
						})
						var result = process(res.tempFilePaths[0])
						uni.getImageInfo({
							src: res.tempFilePaths[0],
							success: (path) => {
								pathToBase64(path.path).then(base64 => {
										_this.imageSrc = base64
										_this.options.entryPic = base64
									})
									.catch(err => {
										console.error(err);
									})
							}
						})
						result.then((res)=>{
							console.log('--result--',JSON.parse(res[1].data))
							uni.hideLoading();
							// _this.options.title = JSON.parse(res[1].data).name[0]
							// _this.options.text = JSON.parse(res[1].data).price[0]
							// _this.$refs.popup.show() // 显示
							_this.$common.navigateTo('/pages/index/detail')
						})
					}
				});

			},
			change() {

				uni.request({
					url: "https://akhaliq-animeganv2.hf.space/api/queue/status/",
					method: 'POST',
					data: {
						"hash": this.hash
					},
					success: (r) => {
						uni.hideLoading()
						// console.log(r.data.data.data[0]);
						this.imageSrc = r.data.data.data[0]

					}
				})
			}
		}
	}
</script>

<style>
	.content {
		display: flex;
		flex-direction: column;
		align-items: center;
		justify-content: center;
		background: linear-gradient(220.55deg, #8FFF85 0%, #39A0FF 100%);
		height: 100vh;
	}

	.image {
		border: 20rpx solid #FFFFFF;
		border-radius: 20rpx;
		height: auto;
		width: 600rpx;
		margin-top: 50rpx;
		margin-left: auto;
		margin-right: auto;
		margin-bottom: 50rpx;
	}

	.text-area {
		display: flex;
		width: 600rpx;
		justify-content: space-around;
		margin-top: 20rpx;
	}

	.title {
		text-align: center;
		font-size: 30rpx;
		color: #ffffff;
	}

	.slogan {
		color: #FFFFFF;
		margin-top: 50rpx;
		font-size: 50rpx;
	}

	.getBtn {
		width: 600rpx;
		border-radius: 50rpx;
		color: #bd2c23;
	}
</style>
4.1.3 菜谱制作详情页
该页展示了如何制作该菜品的全流程,每一步都能信手捏来:
<template>
	<view>
		<u-navbar back-text="详情" :borderBottom="false" :background="background" :back-text-style="{'color':'#fff'}"
			backIconColor="#fff"></u-navbar>
		<view>
			<u-image :src="foodContent.mainImg" height="550" borderRadius="0"></u-image>
			<view class="home">
				<view class="u-flex u-row-between">
					<view class="title-blod">{{foodContent.name}}</view>
					<view>
						<u-icon name="heart" color="#6BC362" size="40" label="收藏"></u-icon>
					</view>
				</view>
				<view class="u-m-t-30 u-flex u-row-between">
					<view class="times">烹饪时间:10分钟</view>
					<view class="times">用餐人数:2人</view>
				</view>
				<!-- <view class="u-m-t-20">
					<u-tag v-for="(item,index) in 10" :key="index" text="小吃" mode="dark" class="tag"
						type="success"></u-tag>
				</view> -->
				<view class="u-m-t-10">
					<view class="title-blod">用料</view>
					<view class="u-flex u-row-between u-m-t-10" v-for="(item,index) in 2" :key="index">
						<view>面粉</view>
						<view>100g<text class="texts"
								:class="index/1==0 ? 'bgFA' : 'bg6B'">{{index/1==0 ? '主料' : '辅料'}}</text></view>
					</view>
				</view>
				<view class="u-m-t-30">
					<view class="title-blod">步骤</view>
					<view v-for="(item,index) in foodContent.steps" :key="index" class="u-m-t-20 card">
						<view class="flex-process">
							<view>{{item.step}}:{{item.operation}}</view>
						</view>
						<u-image :src="item.img" height="350" border-radius="0"></u-image>
					</view>
				</view>
				<view class="u-m-t-30">
					<view class="title-blod u-m-b-10">介绍</view>
					<view>真好吃</view>
				</view>
				<u-gap height="30"></u-gap>
			</view>
		</view>
		<!-- top s -->
		<u-back-top :scrollTop="scrollTop" mode="circle" bottom="200" right="40" top="600" :icon="icon"
			:icon-style="iconStyle" :tips="tips" :custom-style="customStyle">
		</u-back-top>
	</view>
</template>

<script>
	export default {
		data() {
			return {
				foodContent:{},
				background: {
					'background-image': 'linear-gradient(45deg, rgb(28, 187, 180), rgb(141, 198, 63))'
				},
				detail: {},
				scrollTop: 0,
				icon: 'arrow-up',
				iconStyle: {
					color: '#ffffff',
					fontSize: '30rpx'
				},
				tips: '顶部',
				customStyle: {
					backgroundColor: '#6BC362',
					color: '#ffffff'
				},

			}
		},
		async onLoad() {
		await uni.request({
			url: 'http://127.0.0.1:8099/getLastCook',
			method: 'GET',
			success: (result) => {
				console.log('==== 获得结果 ===',result);
				this.foodContent.mainImg = result.data.body.img
				this.foodContent.name = result.data.body.name
				this.foodContent.steps = result.data.body.steps
				console.log('======',this.foodContent);
				this.$forceUpdate()
			}
		})
		},
		methods: {
			// top
			onPageScroll(e) {
				this.scrollTop = e.scrollTop;
			},

		}
	}
</script>

<style lang="scss" scoped>

	.tag {
		margin: 0 20rpx 20rpx 0;
		display: inline-block;
	}

	.bgFA {
		background: #FFAA3E;
	}

	.texts {
		margin-left: 20px;
		width: 40rpx;
		height: 40rpx;
		color: #FFFFFF;
		border-radius: 24rpx;
		font-size: 26rpx;
		padding: 0 20rpx;
	}

	.textp {
		color: #FFFFFF;
		border-radius: 55rpx;
		font-size: 26rpx;
		margin-right: 10rpx;
		padding: 0 10rpx;
		background-image: linear-gradient(45deg, rgb(28, 187, 180), rgb(141, 198, 63));
	}

	.times {
		width: 49%;
		padding: 20rpx 0;
		background-image: linear-gradient(45deg, rgb(28, 187, 180), rgb(141, 198, 63));
		text-align: center;
		color: #FFFFFF;
		font-size: 24rpx;
	}

	.num {
		z-index: 10;
		left: 14rpx;
		font-size: 24rpx;
	}

	.flex-process {
		display: flex;
		    font-weight: bold;
		    padding-bottom: 10px;

	}
	.card {
		    margin: 5px 5px;
		    padding: 5px 5px;
		    border: 1px solid #eee;
		    border-radius: 12px;
	}
</style>
4.2 Flask服务端功能实现
4.2.1 后端数据传输接口实现
数据传输接口主要包括图片数据的接收和保存,以及Flask服务的启动和端口指定
from flask import Flask, jsonify, request
import re,os
from aip import AipImageClassify
import RecognizeCar.CrawleCarHome as carhome
from difflib import SequenceMatcher
import ToCook.CookSpider as cookhome

basedir = os.path.abspath(os.path.dirname(__file__))  # 定义一个根目录 用于保存图片用


@app.route('/getLastCook', methods=['GET', 'POST'])
def getLastCook():
    print(last_result)
    return  last_result


@app.route('/uploadCook', methods=['GET', 'POST'])
def recognizeCookImg():
    # 获取图片文件 name = upload
    img = request.files.get('image')

    # 定义一个图片存放的位置 存放在static下面
    path = basedir + "\\"

    # 图片名称
    imgName = img.filename

    # 图片path和名称组成图片的保存路径
    file_path = path + imgName

    # 保存图片
    img.save(file_path)


    """ 读取图片 """

    def get_file_content(filePath):
        with open(filePath, 'rb') as fp:
            return fp.read()

    image = get_file_content(file_path)

    """ 调用菜品识别 """
    result = client.dishDetect(image)

    print(result['result'][0]['name'])

    # recognized_name = result['result'][0]['name'].replace('_','')
    # print(single_get_first(result['result'][0]['name'].replace('_','')))
    #
    cook_res = cookhome.doSpider(result['result'][0]['name'])

    print(cook_res)
    # for item in car_list1
    #     # print(item['name'][0])
    #     similarity_ratio = SequenceMatcher(None, recognized_name, item['name'][0]).ratio()
    #     if similarity_ratio > 0.7 :
    #         print(item)
    #         return item
    last_result['body']  = cook_res
    return cook_res


if __name__ == '__main__':
    app.run(host="0.0.0.0", port=int("8099"), debug=True)
4.2.2 调用识别接口功能实现
该识别接口主要是调用百度SDK的图像识别接口:
- 安装图像识别 Python SDK
图像识别 Python SDK目录结构
├── README.md
├── aip                   //SDK目录
│   ├── __init__.py       //导出类
│   ├── base.py           //aip基类
│   ├── http.py           //http请求
│   └── imageclassify.py //图像识别
└── setup.py              //setuptools安装
支持Python版本:2.7.+ ,3.+
安装使用Python SDK有如下方式:
- 新建AipImageClassify
AipImageClassify是图像识别的Python SDK客户端,为使用图像识别的开发人员提供了一系列的交互方法。
参考如下代码新建一个AipImageClassify:
    from aip import AipImageClassify

    """ 你的 APPID AK SK """
    APP_ID = '你的 App ID'
    API_KEY = '你的 Api Key'
    SECRET_KEY = '你的 Secret Key'

    client = AipImageClassify(APP_ID, API_KEY, SECRET_KEY)
在上面代码中,常量APP_ID在百度智能云控制台中创建,常量API_KEY与SECRET_KEY是在创建完毕应用后,系统分配给用户的,均为字符串,用于标识用户,为访问做签名验证,可在AI服务控制台中的应用列表中查看,如下:
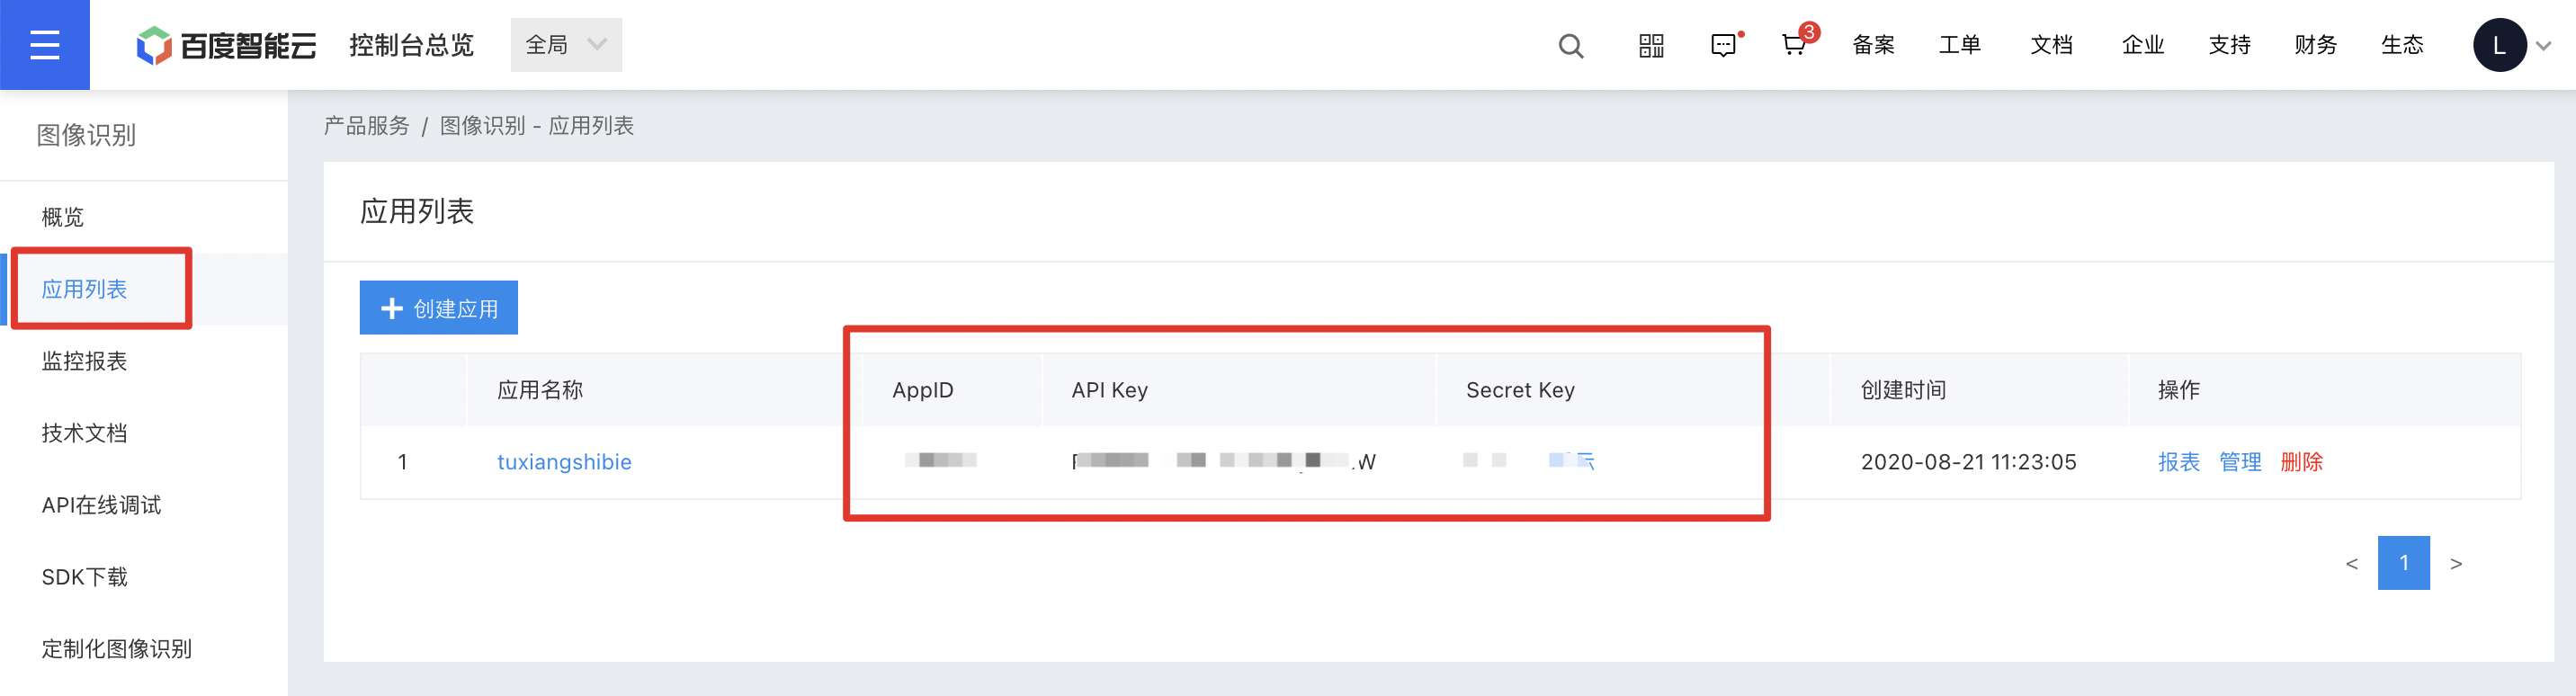
注意:如您以前是百度智能云的老用户,其中API_KEY对应百度智能云的“Access Key ID”,SECRET_KEY对应百度智能云的“Access Key Secret”。
- 配置AipImageClassify(可选)
如果用户需要配置AipFace的网络请求参数(一般不需要配置),可以在构造AipFace之后调用接口设置参数,目前只支持以下参数:
| 接口 | 说明 |
|---|---|
| setConnectionTimeoutInMillis | 建立连接的超时时间(单位:毫秒 |
| setSocketTimeoutInMillis | 通过打开的连接传输数据的超时时间(单位:毫秒) |
4.2.3 Python动态爬虫实现
该过程主要是围绕使用Pthon中的Request库爬虫对下厨房的菜品以及制作步骤进行实时爬取。

import requests,json,re
from lxml import etree,html

BASE_URL  = 'https://www.xiachufang.com'


def doSpider(first_tag):
    url = 'https://www.xiachufang.com/search/?keyword={0}'.format(first_tag)
    resp = requests.get(url)
    # html文档
    resp = requests.get(url, headers={
        'user-agent': 'Mozilla/5.0 (Windows NT 10.0; WOW64) AppleWebKit/537.36 (KHTML, like Gecko) Chrome/63.0.3239.26 Safari/537.36 Core/1.63.6776.400 QQBrowser/10.3.2601.400',
    })
    # resp.encoding = 'utf-8'
    rest = resp.text

    body = etree.HTML(rest)
    res = body.xpath('/html/body/div[4]/div/div/div[1]/div[1]/div/div[2]/div[1]/ul/li')

    result = []
    for item in res:

        obj = {'name':str.strip(item.xpath('.//p[@class="name"]/a/text()')[0]),
               'stepUrl': BASE_URL + str.strip(item.xpath('.//p[@class="name"]/a/@href')[0]),
               'img': item.xpath('./div/a/div/img/@data-src')[0]
               }
        # hh = html.tostring(,encoding='utf-8').decode('utf-8')
        result.append(obj)

        break

    result[0]['steps'] = crawleDetail(result[0])
    print(result[0])
    return result[0]

def crawleDetail(target):
    resp = requests.get(target['stepUrl'], headers={
        'user-agent': 'Mozilla/5.0 (Windows NT 10.0; WOW64) AppleWebKit/537.36 (KHTML, like Gecko) Chrome/63.0.3239.26 Safari/537.36 Core/1.63.6776.400 QQBrowser/10.3.2601.400',
    })
    # resp.encoding = 'utf-8'
    rest = resp.text

    body = etree.HTML(rest)

    source = body.xpath('/html/body/div[4]/div/div/div[1]/div[1]/div/div[5]/table/tr')

    # source_list = []
    # for item in source:
    #     print(html.tostring(item, encoding='utf-8').decode('utf-8'))
    #     print(item.xpath('.//td/a/text()'))
    #     print(item.xpath('.//td/text()'))
    #1、6
    #年CSDN账号码龄,原创高质量博客80余篇,质量分均在90以上。 2、拥有网络工程师中级职称以及电子通信工程(大数据推荐系统方向)硕士学位,发表中文核心论文3余篇。 3、研究生期间与朋友就小程序方向进行创业,用户日活达1000 +。 4、目前就职于国内第二梯队互联网公司,任大数据平台工程师,负责公司风控业务的开发工作,每日处理数据达千万量,有丰富的技术积累。

    steps = body.xpath('/html/body/div[4]/div/div/div[1]/div[1]/div/div[6]/ol/li')

    step_list = []
    for index,item in enumerate(steps):

        obj = {'step':index+1,
               'operation':item.xpath('./p/text()')[0],
               'img':item.xpath('./img/@src')[0]}
        step_list.append(obj)
        print(obj)

    return step_list

    # print(hh)

if __name__ == '__main__':
    doSpider('白菜')
五、拓展阅读
🥇入门和进阶小程序开发,不可错误的精彩内容🥇 :
- 《小程序开发必备功能的吐血整理【个人中心界面样式大全】》
- 《微信小程序 | 动手实现双十一红包雨》
- 《微信小程序 | 人脸识别的最终解决方案》
- 《来接私活吧?小程序接私活必备功能-婚恋交友【附完整代码】》
- 《吐血整理的几十款小程序登陆界面【附完整代码】》