收获:
1.小程序>微信小程序
2.uni-app开发慕课热搜项目
3.构建企业级项目的编程思维
4.上线可商用的企业项目
第5章 uniapp开发ImoocBlog
uniapp开发ImoocBlog
5-1:开篇
经过前面四个章节,我们已经完成了 小程序>微信小程序 的学习。那么从这一章开始我们就进入 uniapp 的项目开发之中。
整个 uniapp 阶段我们会完成一个正式的项目 慕课热搜 , 以这个项目来作为 uniapp 学习阶段的的最终产出,同时通过这个项目来贯穿所有的 uniapp 知识点,可以让大家在学习的过程中不至于那么枯燥。
目前我们的项目已经上线了:
两个版本,因为在【第一章】中已经为大家演示了项目,所以这里就不再重复演示了。
那么现在:
各种前置条件已经全部准备就绪,项目开发即可开始!
5-2:uniapp 难吗?
引言
《慕课热搜》基于 uniapp 进行开发,关于 uniapp 的优点,我们在【课程导学】阶段已经为大家描述过了,忘了的同学可以回过头去看一下。这就不再重复去夸它了。
我们这一小节来点实在的,光知道它好,不行。因为不是你的没啥用对吧。
那么怎么才能学会它呢?它难学吗?这才是这一小节我们需要说明的内容。
内容
点击这里直接进入 uniapp 官网
想要学习 uniapp 那么需要有三个前置条件:
html + css + js: 这个相信大家都没有问题- 小程序>微信小程序:这个我们已经在前面的章节非常详细的为大家讲解过了
vue:可能有很多同学一看这个,心就凉了一截。我不会vue咋办啊…
没有关系!
我敢把这个列出来,肯定就已经为大家想到了这么一点。
vue的理念和 小程序>微信小程序 的理念有非常多相同的地方,在我们后面进行项目开发的过程中,遇到一些个别的语法时,我会为大家进行介绍的。
总之,对于大家来说,这三个条件,如果你全部具备,那自然是最好的。
如果你只具备前两个条件,也不要担心,甚至可以说是更加幸运。因为接下来你将会在学会 uniapp 的同时,也掌握 vue 的核心使用!
5-3:配置项目开发环境
下载并安装开发工具
-
uniapp同样提供了一个专门的开发工具HBuilder X,可以点击 这里直接进入下载页面 -
点击
DOWNLOAD -
选择
App 开发版本
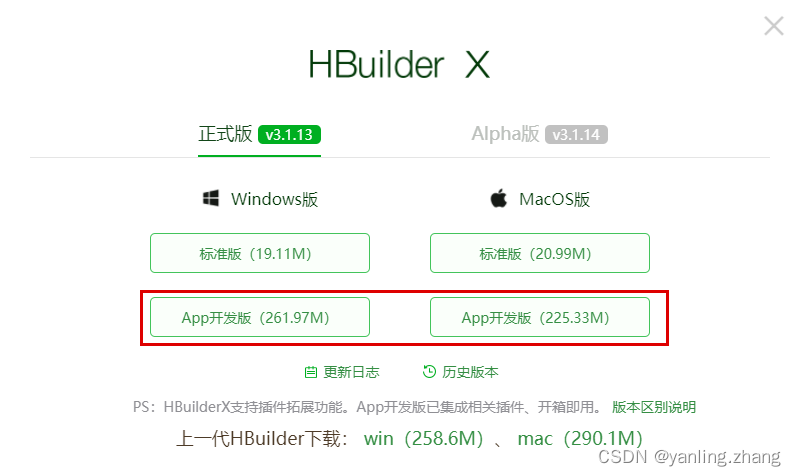
-
windows版本下载完成之后会得到一个zip的压缩包文件,解压完成即可使用 -
macos版本下来完成会得到一个dmg的安装包,直接安装即可
安装 sass 依赖
因为我们的项目开发会使用 sass,所以需要为 HBuilder X 安装 sass 编译器。
-
打开
HBuilder X -
打开插件地址:https://ext.dcloud.net.cn/plugin?id=2046
-
点击【使用
HBuilderX导入插件】
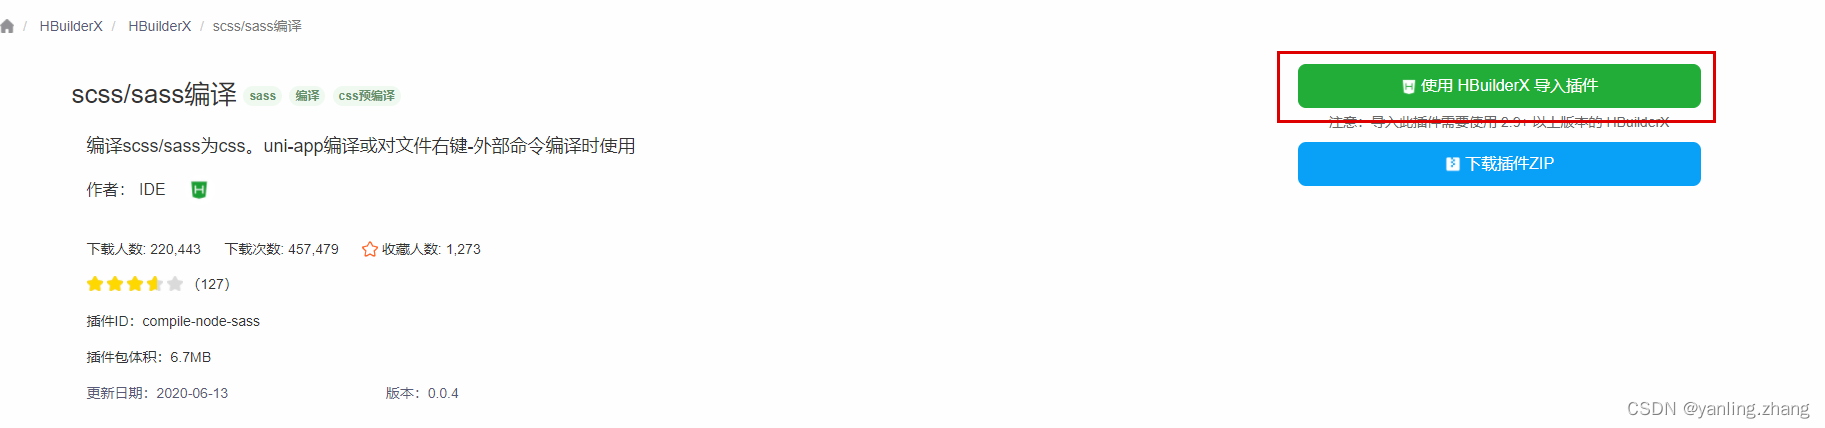
-
在弹出框中点击【打开
HBuilderX】
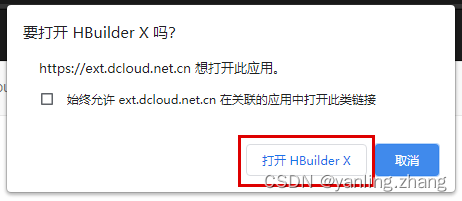
-
点击【是】
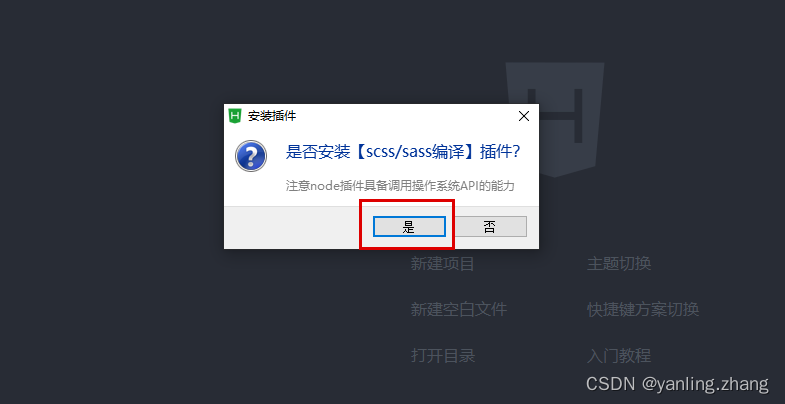
-
此时会在
HBuilderX右下角,提示你【正在下载】
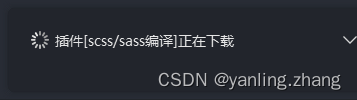
-
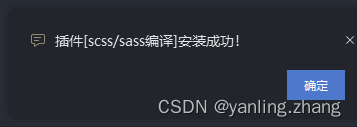
等待完成即可
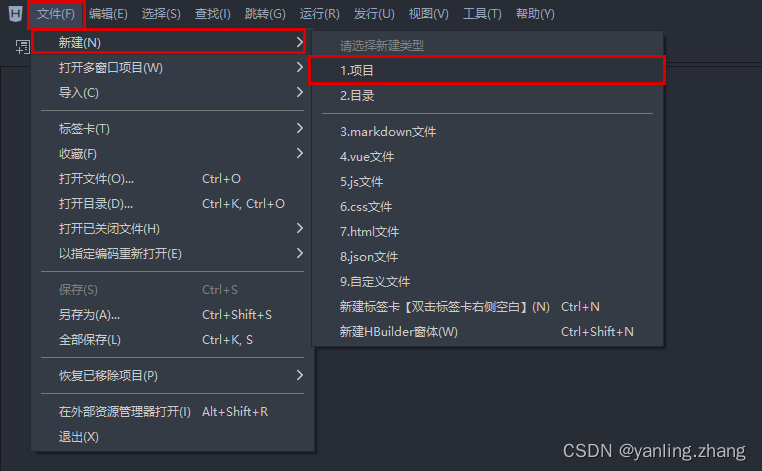
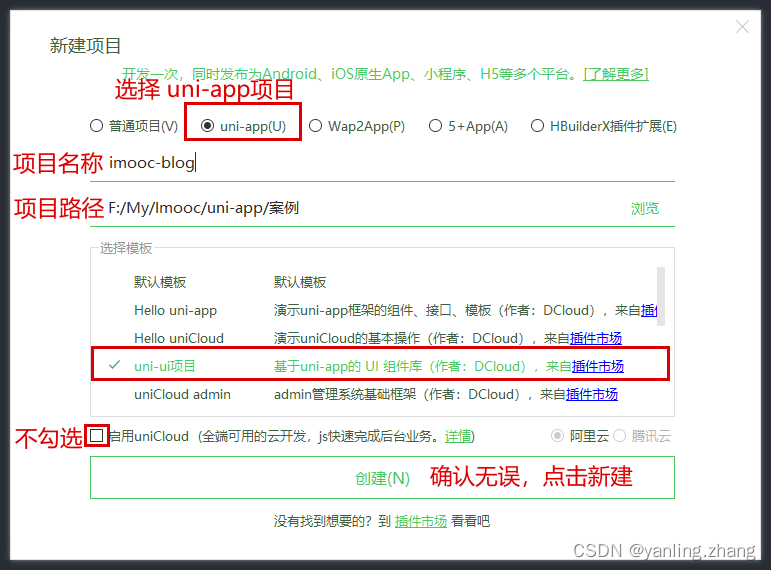
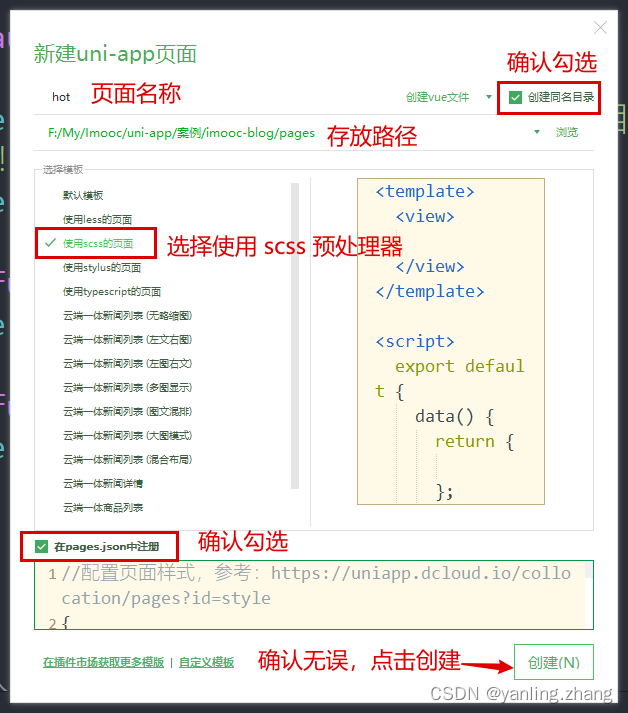
5-4:创建 imooc-blog
创建 uni-app 项目
-
创建项目
项目目录介绍
├─pages			    // 页面存放文件夹,等同于 小程序>微信小程序中的 pages
│  └─index			// 默认生成的页面
├─static			// 静态资源存放文件夹
└─uni_modules		// uni-app组件目录
│  └─uni-xxx		// uni-app 所提供的业务组件,等同于 小程序>微信小程序中的组件
├─App.vue			// 应用配置文件,用来配置全局样式、生命周期函数等,等同于 小程序>微信小程序中的app.js
└─main.js			// 项目入口文件
├─mainfest.json		 // 配置应用名称、appid、logo、版本等打包信息,
└─pages.json		// 配置页面路径、窗口样式、tabBar 等页面类信息,等同于 小程序>微信小程序中的app.json
└─uni.scss			// uni-app内置的常用样式变量
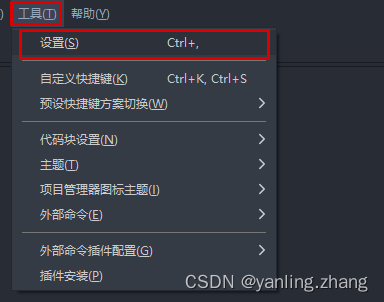
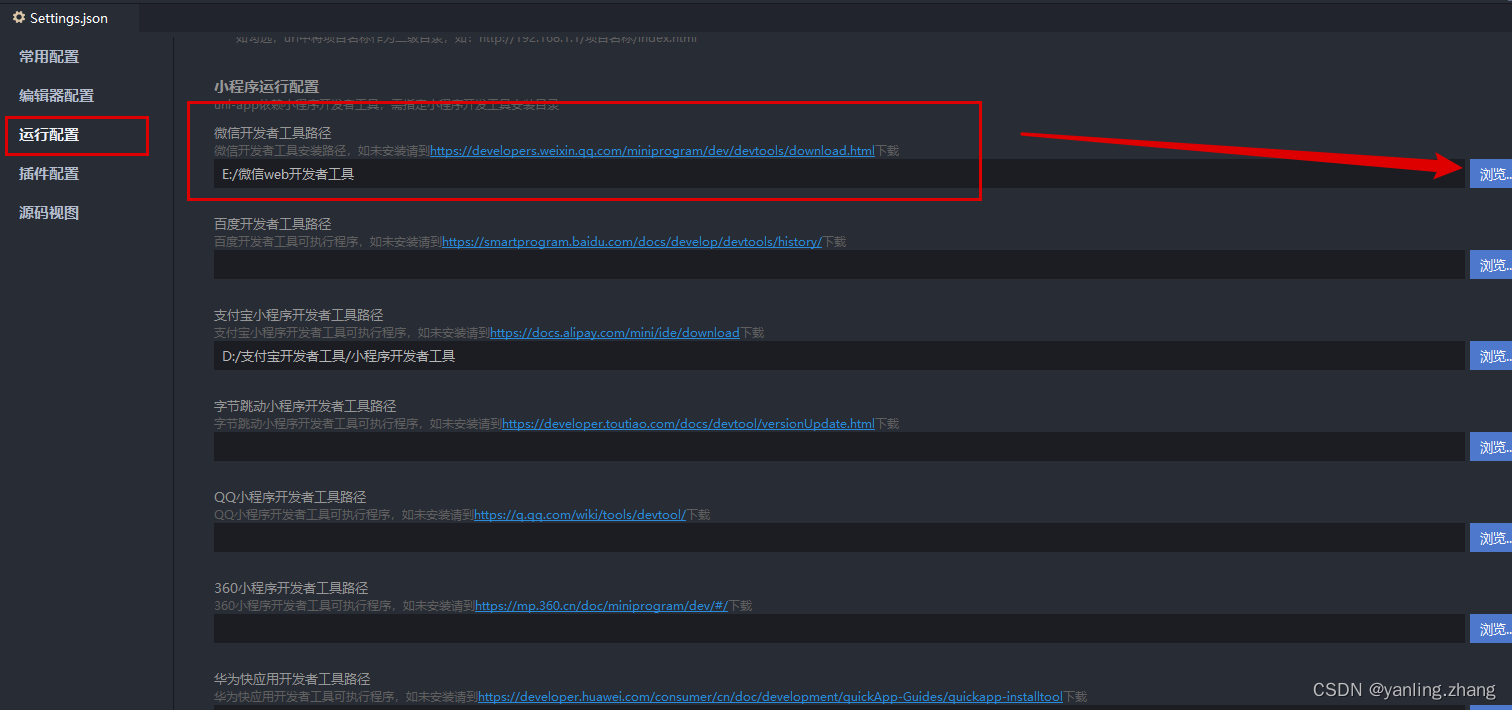
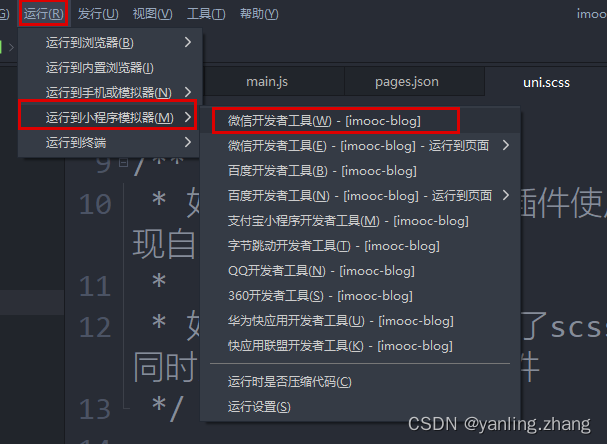
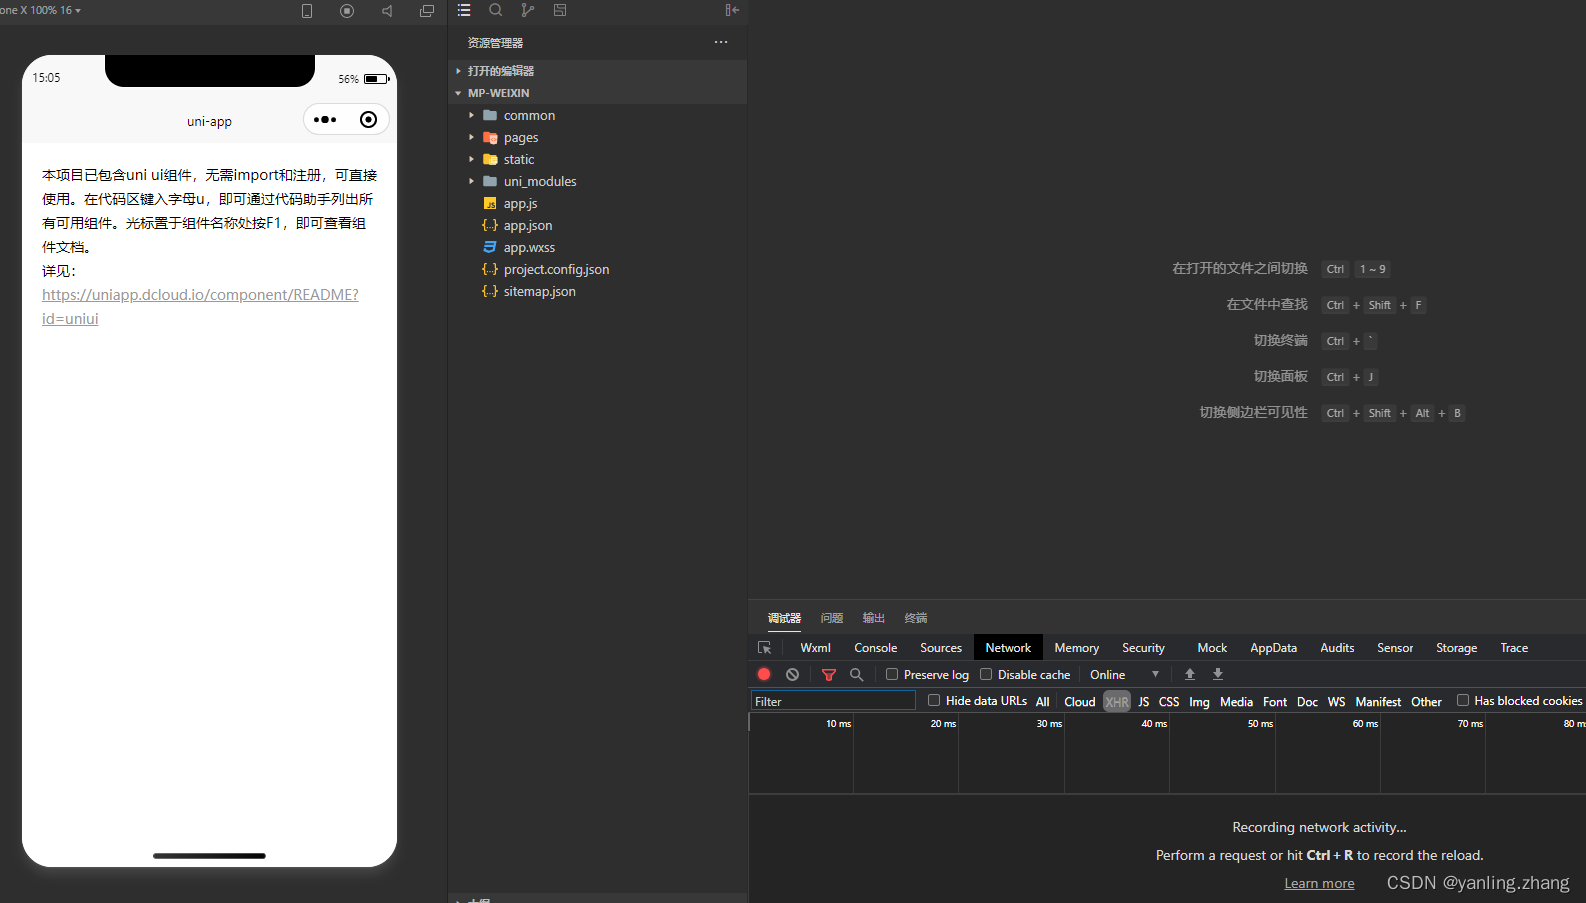
5-5:运行项目到 微信开发者工具
uniapp 支持10个平台,我们已 小程序>微信小程序 和 h5 平台为例子,进行演示。
运行到 小程序>微信小程序


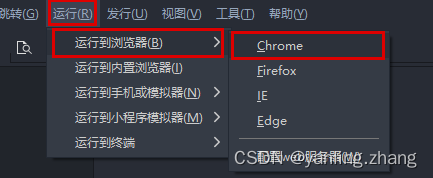
运行到浏览器
-
切记: 一定要在
HBuilder X中双击打开你项目中的某一个文件(比如:App.vue)
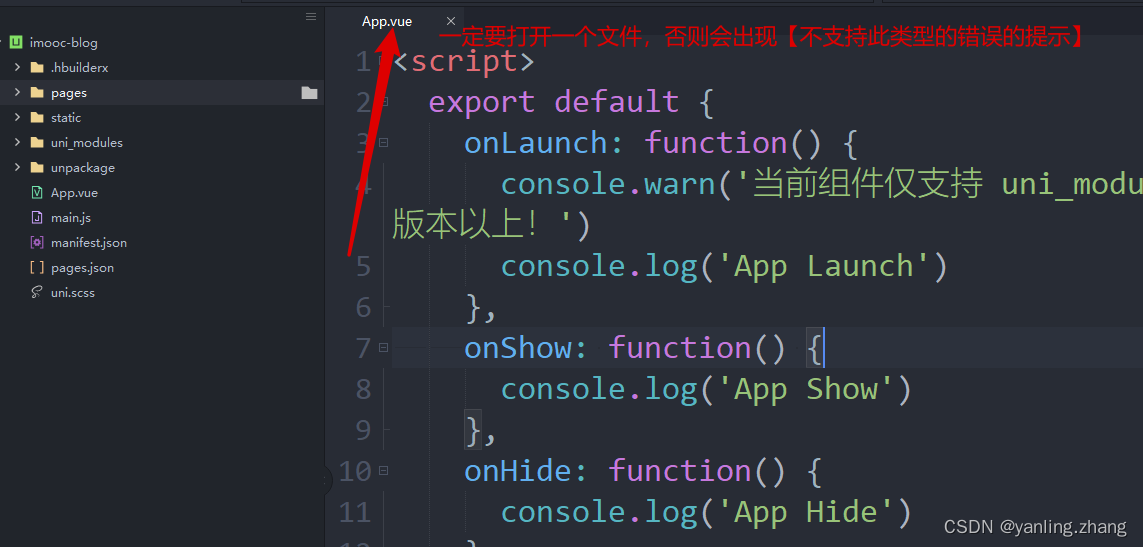
-
无需配置,直接运行
5-6:使用 VSCode 开发 uniapp(当你想要使用 VSCode 来开发 uniapp 时,可以查看本小节)
虽说 HBuilder X 开发体验还算不错,但是有时候金窝银窝不如自己的狗窝,当我们习惯了 VSCode 之后,有时候不太愿意换开发工具。
那么怎么使用 VSCode 来开发 uniapp 呢? 其实是有办法的。
- 使用
HBuilder X运行项目(运行方式,参考上一小节) - 使用
VSCode打开项目 - 在
VSCode中安装插件: - 在
VSCode中修改代码,运行结果自动发生变化
5-7:创建与配置 tabbar
创建页面
-
删除
pages下的index文件夹 -
在
pages文件夹处,右键 -> 选择新建页面 -
确认新建页面的信息
-
点击创建按钮完成新建。
-
循环以上顺序,依次完成
hot、hot-video、my三个页面的创建
配置 pages.json
-
删除
index路径 -
新建
tabbar节点 -
复制 资源 文件夹下
tab-icons文件夹到static文件夹中 -
最终代码如下:
"tabBar": { "selectedColor": "#f94d2a", "list": [ { "pagePath": "pages/hot/hot", "text": "热榜", "iconPath": "static/tab-icons/hot.png", "selectedIconPath": "static/tab-icons/hot-active.png" }, { "pagePath": "pages/hot-video/hot-video", "text": "热播", "iconPath": "static/tab-icons/hot-video.png", "selectedIconPath": "static/tab-icons/hot-video-active.png" }, { "pagePath": "pages/my/my", "text": "我的", "iconPath": "static/tab-icons/my.png", "selectedIconPath": "static/tab-icons/my-active.png" } ] } -
如果修改完成之后,依然得到了以下错误,那么可以在
HBuilder X中重新运行项目到微信开发者工具解决

5-8:警告与错误处理
解决 【sitemap索引情况提示】的警告问题

小程序>微信小程序默认开启了索引功能,但是因为我们没有配置索引策略,导致出现了这么一个警告的问题。具体情况可以参考:https://developers.weixin.qq.com/miniprogram/dev/framework/sitemap.html
而如果想要解决这个警告也非常简单,因为一般情况项目不需要被微信索引,所以我们只需要 关闭 默认索引功能即可!
-
双击打开
manifest.json -
点击源码试图
-
下翻找到
mp-weixin配置节点 -
在
settings下新增"checkSiteMap" : false
解决 Cannot read property 'forceUpdate' of undefined 的错误
这个错误的原因非常简单,是因为我们没有为项目配置 appID 的原因,所以只需要完成 APPID 配置即可。

5-9:热搜页面分析
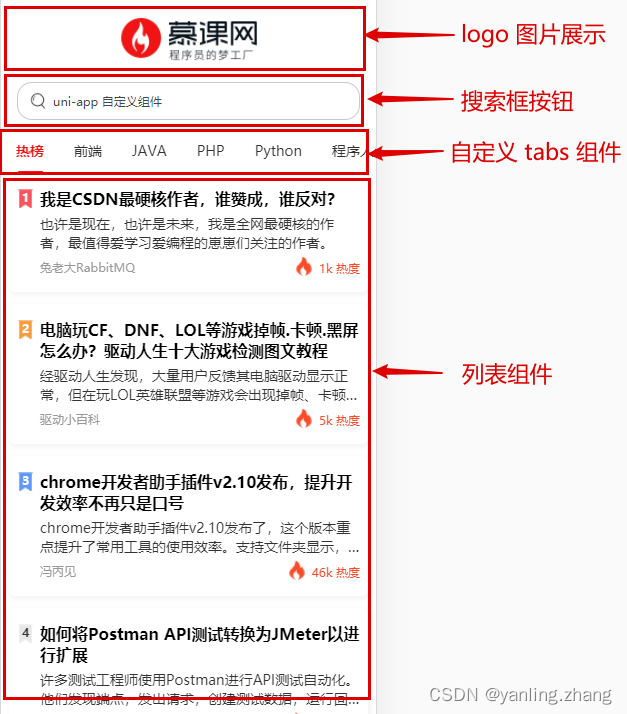
5-10:认识 .vue 文件结构与 logo 图片展示
.vue 文件结构
template:定义当前页面的结构。相当于wxmlscript:定义当前页面的逻辑。相当于jsstyle:定义当前页面的样式。相当于wxss- 为
style标签增加scoped属性:表示当前样式只在当前页面生效
- 为
logo 图片展示
<template>
  <view class="hot-container">
    <!-- logo -->
    <image class="logo" mode="aspectFit" src="@/static/images/logo.png" />
  </view>
</template>
<style lang="scss" scoped>
.hot-container {
  background-color: $uni-bg-color;
  .logo {
    width: 100%;
    height: 80px;
  }
}
</style>
5-11:创建搜索框组件
-
创建
components文件夹 -
右键新建组件
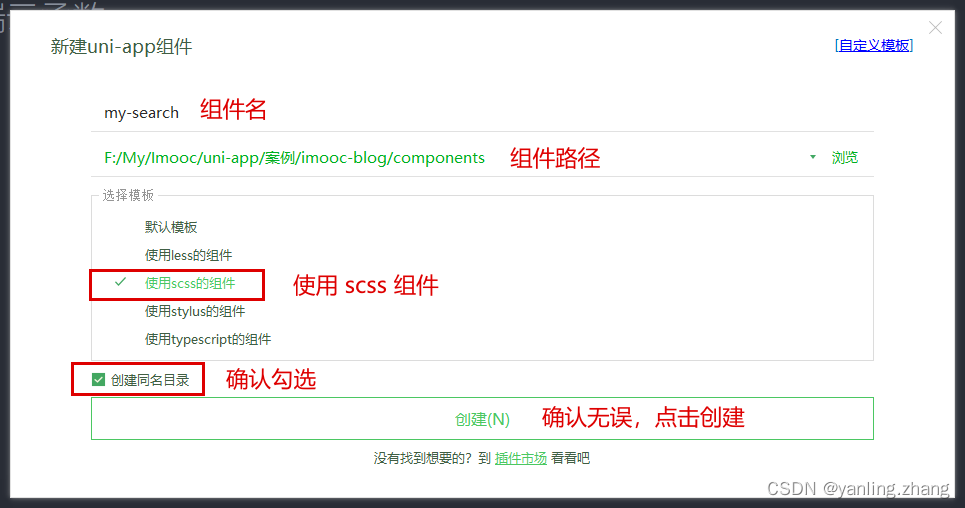
-
明确当前
my-search组件的能力(暂时不需要考虑太多之后的能力)- 具备输入框的样式
- 不可进行输入
placeholder内容可以在父组件定义
-
代码实现
my-search.vue<template> <view class="my-search-container"> <!-- 搜索按钮 --> <view class="my-search-box"> <image class="icon" src="@/static/images/search.png" /> <text class="placeholder" :style="{ color: config.textColor }" >{{ placeholderText }}</text > </view> </view> </template> <script> export default { name: 'my-search', props: { placeholderText: { type: String, default: '搜索' } }, data() { return {}; } }; </script> <style lang="scss"> .my-search-container { display: flex; align-items: center; .my-search-box { height: 36px; background-color: #ffffff; border-radius: 15px; border: 1px solid #c9c9c9; width: 100%; display: flex; align-items: center; padding: 0 $uni-spacing-row-base; .icon { width: $uni-img-size-sm; height: $uni-img-size-sm; } .placeholder { font-size: $uni-font-size-sm; margin-left: $uni-spacing-row-sm; color: #454545; } } } </style>hot.vue<view class="search-box"> <!-- 搜索模块 --> <my-search placeholderText="uni-app 自定义组件" /> </view> <style lang="scss" scoped> .hot-container { ... .search-box { padding: 0 16px; margin-bottom: $uni-spacing-col-base; } } </style>
5-12:tabs组件 - 创建并分析 my-tabs 组件
-
创建
my-tabs组件 -
分析
my-tabs组件的能力 -> 希望创建一个通用的my-tabs组件,可以满足各个应用中的需求-
可在父组件中定制
my-tabs样式 -
可在父组件中设置展示数据
-
可在父组件中设置默认的激活项
-
由此分析,定义处以下代码:
<script>
export default {
  name: 'my-tabs',
  props: {
    // 父组件传入的 tabs 数据
    tabData: {
      type: Array,
      default: () => []
    },
    // 默认激活项
    defaultIndex: {
      type: Number,
      default: 0
    },
    // 配置对象
    config: {
      type: Object,
      default: () => {
        return {};
      }
    }
  }
};
</script>
-
5-13:tabs组件 - 封装网络请求
-
创建
utils文件夹 -
创建
request.js,封装请求对象const BASE_URL = 'https://api.imooc-blog.lgdsunday.club/api'; function request({ url, data, method }) { return new Promise((resolve, reject) => { uni.request({ url: BASE_URL + url, data, method, success: ({ data }) => { if (data.success) { resolve(data); } else { uni.showToast({ title: data.message, icon: 'none', mask: true, duration: 3000 }); reject(data.message); } }, fail: (error) => { reject(error); } }); }); } export default request; -
创建
api文件夹 -
创建
hot文件,封装hot相关的请求方法import request from '../utils/request'; export function getHotTabs() { return request({ url: '/hot/tabs' }); }
5-14:tabs组件 - 进行基本的数据展示
-
在
hot中使用<template> <view class="hot-container"> ... <!-- tabs --> <my-tabs :tabData="tabData" :defaultIndex="currentIndex"></my-tabs> </view> </template> <script> import { getHotTabs } from 'api/hot'; export default { data() { return { // tabs 数据源 tabData: [], // 当前的切换 index currentIndex: 0 }; }, // 在实例创建完成后被立即调用 created() { this.getHotTabs(); }, // 定义方法 methods: { /** * 获取热搜标题数据 */ async getHotTabs() { // uniapp 支持 async await const { data: res } = await getHotTabs(); this.tabData = res.list; } } }; </script> -
在
tabs中展示<template> <view class="tab-container"> <view class="tab-box"> <scroll-view id="_scroll" scroll-x class="scroll-view" scroll-with-animation> <view class="scroll-content"> <view class="tab-item-box"> <block v-for="(item, index) in tabData" :key="index"> <view class="tab-item">{{ item.label || item }}</view> </block> </view> </view> </scroll-view> </view> </view> </template>
5-15:tabs组件 - 美化样式
my-tabs
<style lang="scss" scoped>
.tab-container {
  font-size: $uni-font-size-base;
  height: 45px;
  line-height: 45px;
  background-color: $uni-bg-color;
  .tab-box {
    width: 100%;
    height: 45px;
    display: flex;
    position: relative;
    .scroll-view {
      white-space: nowrap;
      width: 100%;
      height: 100%;
      box-sizing: border-box;
      .scroll-content {
        width: 100%;
        height: 100%;
        position: relative;

        .tab-item-box {
          height: 100%;
          .tab-item {
            height: 100%;
            display: inline-block;
            text-align: center;
            padding: 0 15px;
            position: relative;
            text-align: center;
            color: $uni-text-color;
          }
        }
      }
    }
  }
}
</style>
5-16:tabs组件 - 设置激活项
-
因为根据 子组件不可以直接修改父组件传递过来的数据 特性,所以可以通过定义一个
data-> activeIndex来跟随defaultIndex的变化<script> export default { data: () => { return { // 当前激活项的 index activeIndex: -1 }; }, // 侦听器 watch: { // 监听激活项目的变化 defaultIndex: { handler(val) { this.activeIndex = val; }, // 该回调将会在侦听开始之后被立即调用 immediate: true } }, } </script> -
找到
tab-item的view,判断active的状态。并添加点击事件,修改activeIndex的值<view class="tab-item" :class="{ 'tab-item-active': activeIndex === index }" @click="tabClick(index)" >{{ item.label || item }}</view >methods: { /** * tab 的点击事件处理 */ tabClick(index) { this.activeIndex = index; // 发送通知 this.$emit('tabClick', index); } }&-active { color: $uni-text-color-hot; font-weight: bold; } $uni-text-color-hot: #f94d2a; // 热点颜色
5-17:tabs组件 - 定义滑块
<!-- 滑块 -->
<view
      class="underLine"
      :style="{
              transform: 'translateX(' + slider.left + 'px)'
              }"
      />
data: () => {
    return {
      // 滑块
      slider: {
        // 距离左侧的距离
        left: 0
      }
    };
  },
.underLine {
    height: 2px;
    width: 25px;
    background-color: #f01414;
    border-radius: 3px;
    transition: 0.5s;
    position: absolute;
    bottom: 0;
}
5-18:tabs组件 - 实现滑块的滚动 - 01
实现滑块滚动的功能
- 确定滚动的时机
- 计算滚动的距离
确定滚动的时机
- 监听激活项目的变化
- tab 的点击事件处理
确定滚动时机后,执行滚动的方法
/**
     * 根据当前的 activeIndex 下标,计算 【滑块】 滚动位置
     */
tabToIndex() {
    // 获取当前的 activeIndex
    const activeIndex = this.activeIndex;
    // 滑块的宽度
    const underLineWidth = this.defaultConfig.underLineWidth;
    // 配置 滚动条 的数据
    this.slider = {
        // TODO:left 如何定义呢?
        left: 0
    };
    console.log('TODO:left 如何定义呢?');
}

data: () => {
    return {
      // 默认配置
      defaultConfig: {
        // 下划线宽度 px
        underLineWidth: 24,
        // 下划线高度 px
        underLineHeight: 2,
        // 下划线颜色
        underLineColor: '#f94d2a'
      }
    };
5-19:tabs组件 - 实现滑块的滚动 - 02
实现滑块滚动的功能
- 确定滚动的时机
- 计算滚动的距离
- 维护一个单独的数据对象
tabList - 在
tabList的item中为一个_slider属性 - 该属性保存了 【当前
item下 的滑块位置】- 计算公式:
滑块左侧位置 = item.left + (item.width - slider.width) / 2
- 计算公式:
- 维护一个单独的数据对象
data: () => {
    return {
      // 内部维护的数据对象,为每个 item 单独额外维护一个 slider 的滑块对象
      tabList: []
    };
  },

 // 侦听器
  watch: {
    // 侦听数据的变化
    tabData: {
      handler(val) {
        this.tabList = val;
        setTimeout(() => {
          this.updateTabWidth();
        }, 0);
      },
      // 该回调将会在侦听开始之后被立即调用
      immediate: true
    },
  },

      /**
     * 更新 tab item 的宽度
     */
      updateTabWidth() {
          /**
       * 为 tabList 的每个 item 单独额外维护一个 slider 的滑块对象
       */
          let data = this.tabList;
          if (data.length == 0) return false;

          // 获取 dom 的固定写法
          const query = uni.createSelectorQuery().in(this);
          // 循环数据源
          data.forEach((item, index) => {
              // 获取 dom 的固定写法
              query
                  .select('#_tab_' + index)
                  .boundingClientRect((res) => {
                  // 为数据对象中每一个 item 都维护一个 _slider(滑动条) 对象
                  item._slider = {
                      // 当前的 tab 距离左侧的距离
                      left: res.left + (res.width - this.defaultConfig.underLineWidth) / 2
                  };
                  // 运算完成之后,执行一次 【滑块】位置运算
                  if (data.length - 1 === index) {
                      this.tabToIndex();
                  }
              })
                  .exec();
          });
      },
    /**
     * 根据当前的 activeIndex 下标,计算 【滑块】 滚动位置
     */
    tabToIndex() {
      if (this.tabList.length === 0) return;
      // 获取当前的 activeIndex
      const activeIndex = this.activeIndex;
      // 滑块的宽度
      const underLineWidth = this.defaultConfig.underLineWidth;
      // 配置 滚动条 的数据
      this.slider = {
        // TODO:left 如何定义呢?
        // 1. 维护一个单独的数据对象 `tabList`
        // 2. 在 `tabList`  的 `item` 中为一个 `_slider` 属性
        // 3. 该属性保存了 【当前 `item` 下 的滑块位置】
        //    3.1. 计算公式:`滑块左侧位置 = item.left + (item.width - slider.width) / 2`
        left: this.tabList[activeIndex]._slider.left
      };
    }
5-20:tabs组件 - scrollView 的点击位移
当 【选中项】发生变化时,希望 scrollView 也进行对应的位移。
  <scroll-view
        :scroll-left="scrollLeft"
      ></scroll-view>

// scrollView 的横向滚动条位置
scrollLeft: 0,
简单的算法:
this.scrollLeft = this.activeIndex * this.defaultConfig.underLineWidth;
5-21:tabs组件 - 增加可配置项
<view
      class="tab-item"
      :id="'_tab_' + index"
      :class="{ 'tab-item-active': activeIndex === index }"
      @click="tabClick(index)"
      :style="{
              color:
              activeIndex === index ? defaultConfig.activeTextColor : defaultConfig.textColor
              }"
      >{{ item.label || item }}</view>
  props: {
    // 配置对象
    config: {
      type: Object,
      default: () => {
        return {};
      }
    }
  },
  data: () => {
    return {
      // 默认配置
      defaultConfig: {
        // 默认的字体颜色
        textColor: '#333333',
        // 高亮字体颜色
        activeTextColor: '#f94d2a',
        // 下划线宽度 px
        underLineWidth: 24,
        // 下划线高度 px
        underLineHeight: 2,
        // 下划线颜色
        underLineColor: '#f94d2a'
      }
    };
  },
  // 侦听器
  watch: {
    // 监听 config
    config: {
      handler(val) {
        this.defaultConfig = { ...this.defaultConfig, ...val };
      },
      // 该回调将会在侦听开始之后被立即调用
      immediate: true
    }
  },
5-22:List 组件 - 分析 List 组件
- 使用 mock 数据,构建 List 的基本结构
- 美化 item 样式
- 根据 tab 的切换,获取真实数据
- 渲染真实数据
- 通过 swiper 改造List
- 完成 swiper 和 tabs 的联动效果
5-23: List 组件 - 使用 mock 数据,构建 List 的基本结构
hot.vue
<template>
 	...
    <!-- list -->
    <view>
      <hot-list-item v-for="(item, index) in 50" :key="index"></hot-list-item>
    </view>
  </view>
</template>
hot-list-item.vue
<template>
  <view class="item-container">
    <view class="item-box">
      <view class="item-box-left">
        <hot-ranking />
      </view>
      <view class="item-box-right">
        <!-- 标题 -->
        <view class="item-title line-clamp-2">标题</view>
        <!-- 简介 -->
        <view class="item-desc line-clamp-2">简介</view>
        <view class="item-bottom-box">
          <!-- 作者 -->
          <text class="item-author">作者</text>
          <!-- 热度 -->
          <view class="hot-box">
            <image class="hot-icon" src="@/static/images/hot-icon.png" />
            <text class="hot-text">1000 热度</text>
          </view>
        </view>
      </view>
    </view>
  </view>
</template>

<script>
export default {
  name: 'hot-list-item',
  data() {
    return {};
  }
};
</script>

<style lang="scss" scoped></style>
hot-ranking.vue
<template>
  <view class="ranking">
    <image class="ranking-bg" :src="getRankingBg" />
    <text class="ranking-text">1</text>
  </view>
</template>

<script>
export default {
  name: 'hot-ranking'
};
</script>

<style lang="scss" scoped></style>
5-24: List 组件 - 美化 item 样式
hot-list-item.vue
<style lang="scss" scoped>
.item-container {
  padding-bottom: $uni-spacing-col-lg;
  .item-box {
    display: flex;
    margin: 0 $uni-spacing-col-base;
    padding: $uni-spacing-row-lg $uni-spacing-col-base;
    background-color: $uni-bg-color;
    border-radius: $uni-border-radius-lg;
    box-shadow: 2px 2px 5px 1px rgba(143, 143, 143, 0.1);
    .item-box-left {
      margin-right: $uni-spacing-row-sm;
    }
    .item-box-right {
      width: 100%;
      .item-title {
        font-size: $uni-font-size-lg;
        font-weight: bold;
        color: $uni-text-color-title;
      }
      .item-desc {
        padding-top: $uni-spacing-row-sm;
        font-size: $uni-font-size-base;
        color: $uni-text-color;
      }
      .item-bottom-box {
        margin-top: $uni-spacing-col-sm;
        display: flex;
        justify-content: space-between;
        align-items: center;
        .item-author {
          font-size: $uni-font-size-sm;
          color: $uni-text-color-grey;
        }
        .hot-box {
          .hot-icon {
            width: $uni-img-size-sm;
            height: $uni-img-size-sm;
            vertical-align: top;
          }
          .hot-text {
            margin-left: $uni-spacing-row-sm;
            font-size: $uni-font-size-sm;
            color: $uni-text-color-hot;
          }
        }
      }
    }
  }
}
</style>
hot-ranking.vue
<style lang="scss" scoped>
.ranking {
  position: relative;
  text-align: center;
  width: 18px;
  height: 20px;
  .ranking-bg {
    width: 100%;
    height: 100%;
  }
  .ranking-text {
    position: absolute;
    left: 50%;
    top: 50%;
    transform: translate(-55%, -55%);
    font-size: $uni-font-size-sm;
    font-weight: bold;
    color: $uni-text-color;
  }
  .text-white {
    color: white;
  }
}
</style>
5-25: List 组件 - 根据 tab 的切换,获取真实数据
hot.js
/**
 * 热搜文章列表
 */
export function getHotListFromTabType(type) {
  return request({
    url: '/hot/list',
    data: {
      type
    }
  });
}
hot.vue
<template>
    <!-- tabs -->
    <my-tabs
      ...
      @tabClick="tabClick"
    ></my-tabs>
	<!-- list -->
    <view>
      <!-- 加载动画 -->
      <uni-load-more status="loading" v-if="isLoading"></uni-load-more>
      <!-- 列表 -->
      <block v-else>
        <hot-list-item v-for="(item, index) in 50" :key="index"></hot-list-item>
      </block>
    </view>
  </view>
</template>

<script>
import { getHotTabs, getHotListFromTabType } from 'api/hot';
export default {
  data() {
    return {
      ...
      // list 列表数据加载过程
      isLoading: true,
      // 以 index 为 key,对应的 list 为 val
      listData: {}
    };
  },
  // 定义方法
  methods: {
    /**
     * 获取热搜标题数据
     */
    async getHotTabs() {
      ...
      // 获取列表数据
      this.getHotListFromTab();
    },
    /**
     * list 列表数据
     */
    async getHotListFromTab() {
      // 展示 loading
      this.isLoading = true;
      // 判断缓存是否有数据,不存在则重新获取数据
      if (!this.listData[this.currentIndex]) {
        // 获取列表数据
        const id = this.tabData[this.currentIndex].id;
        const { data: res } = await getHotListFromTabType(id);
        // 放入数据缓存
        this.listData[this.currentIndex] = res.list;
      }

      // 隐藏 loading
      this.isLoading = false;
    },
    /**
     * tab item 的点击事件
     */
    tabClick(index) {
      this.currentIndex = index;
      // 获取列表数据
      this.getHotListFromTab();
    }
  }
};
</script>
5-26:List 组件 - 渲染真实数据
hot.vue
<hot-list-item
    v-for="(item, index) in listData[currentIndex]"
    :key="index"
    :data="item"
    :ranking="index + 1"
></hot-list-item>
hot-list-item.vue
<template>
  <view class="item-container" @click="$emit('click')">
    <view class="item-box">
      <view class="item-box-left">
        <hot-ranking :ranking="ranking" />
      </view>
      <view class="item-box-right">
        <!-- 标题 -->
        <view class="item-title line-clamp-2">{{ data.title }}</view>
        <!-- 简介 -->
        <view class="item-desc line-clamp-2">{{ data.desc }}</view>
        <view class="item-bottom-box">
          <!-- 作者 -->
          <text class="item-author">{{ data.nickname }}</text>
          <!-- 热度 -->
          <view class="hot-box">
            <image class="hot-icon" src="@/static/images/hot-icon.png" />
            <text class="hot-text">{{ data.views }} 热度</text>
          </view>
        </view>
      </view>
    </view>
  </view>
</template>

<script>
export default {
  name: 'hot-list-item',
  props: {
    data: {
      type: Object,
      required: true
    },
    ranking: {
      type: Number,
      required: true
    }
  },
  data() {
    return {};
  }
};
</script>
hot-ranking.vue
<template>
  <view class="ranking">
    <image class="ranking-bg" :src="getRankingBg" />
    <text class="ranking-text" :class="{ 'text-white': ranking <= 3 }">{{ ranking }}</text>
  </view>
</template>

<script>
export default {
  name: 'hot-ranking',
  props: {
    ranking: {
      type: Number,
      required: true
    }
  },
  /**
   * 当依赖值发生变化时,会重新计算
   */
  computed: {
    getRankingBg() {
      if (this.ranking <= 3) {
        return require(`@/static/images/ranking-${this.ranking}.png`);
      }
      return require('@/static/images/ranking-other.png');
    }
  }
};
</script>
style/global.scss
/**
 * 这里是共用样式的定义位置
 */

.line-clamp-2 {
  overflow: hidden;
  text-overflow: ellipsis;
  display: -webkit-box;
  -webkit-box-orient: vertical;
  -webkit-line-clamp: 2;
}
main.js
// 通用样式
import './styles/global.scss';
5-27:List 组件 - 通过 swiper 改造List
想要让 list 具备【横向翻页】的效果,那么可以使用 swiper 对其进行改造!
 <!-- 基于 swiper 的 list 列表 -->
    <swiper class="swiper" :current="currentIndex">
      <swiper-item class="swiper-item" v-for="(tabItem, tabIndex) in tabData" :key="tabIndex">
        <view>
          <!-- 加载动画 -->
          <uni-load-more status="loading" v-if="isLoading"></uni-load-more>
          <!-- 列表 -->
          <block v-else>
            <!-- 列表循环数据更改为 listData[tabIndex] -->
            <hot-list-item
              v-for="(item, index) in listData[tabIndex]"
              :key="index"
              :data="item"
              :ranking="index + 1"
            ></hot-list-item>
          </block>
        </view>
      </swiper-item>
    </swiper>
当前的问题:
- 列表高度展示错误
- 切换
tab时的list的卡顿问题
5-28:List 组件 - 解决列表高度展示错误的问题
原因:
没有给 swiper 指定高度。
解决方案:
指定高度即可。
<template>
  <view class="hot-container">
    <!-- 基于 swiper 的 list 列表 -->
    <swiper class="swiper" :current="currentIndex" :style="{ height: currentSwiperHeight + 'px' }">
     ...
            <hot-list-item
              :class="'hot-list-item-' + tabIndex"
              v-for="(item, index) in listData[tabIndex]"
              :key="index"
              :data="item"
              :ranking="index + 1"
            ></hot-list-item>
         ...
    </swiper>
  </view>
</template>

<script>
export default {
  data() {
    return {
      // 当前 swiper 的高度
      currentSwiperHeight: 0,
      // 以 index 为 key,对应的 swiper 的高度 为 val
      swiperHeightData: {}
    };
  },
  // 定义方法
  methods: {
    /**
     * list 列表数据
     */
    async getHotListFromTab() {
      ...
      // 因为 this.$nextTick 存在一定的兼容性问题,所以更加推荐使用 setTimeout
      setTimeout(async () => {
        // 获取当前 swiper 的高度
        this.currentSwiperHeight = await this.getCurrentSwiperHeight();
        // 放入缓存
        this.swiperHeightData[this.currentIndex] = this.currentSwiperHeight;
      }, 0);
    },
    /**
     * 计算当前 swiper 的高度
     */
    getCurrentSwiperHeight() {
      return new Promise((resolve, reject) => {
        let sum = 0;
        const query = uni.createSelectorQuery().in(this);
        query
          .selectAll(`.hot-list-item-${this.currentIndex}`)
          .boundingClientRect((res) => {
            res.forEach((item) => {
              sum += item.height;
            });
            resolve(sum);
          })
          .exec();
      });
    }
  }
};
</script>
5-29:List 组件 - 解决 切换 tab 时的 list 的卡顿问题
原因:
动画未执行完成,DOM 未渲染完成,即获取数据,执行了新的渲染逻辑。
解决方案:
等待 动画执行完成, DOM 渲染完成。之后再获取数据,渲染列表。
<template>
 <swiper
      class="swiper"
      :current="currentIndex"
      :style="{ height: currentSwiperHeight + 'px' }"
      @animationfinish="onSwiperEnd"
    >
</template>

<script>
import { getHotTabs, getHotListFromTabType } from 'api/hot';
export default {
  // 定义方法
  methods:
    /**
     * list 列表数据
     */
    async getHotListFromTab() {
      // 在 onSwiperEnd 中进行判断。【判断缓存是否有数据,不存在则重新获取数据】
    },
    /**
     * tab item 的点击事件
     */
    tabClick(index) {
      this.currentIndex = index;
      // 获取列表数据
      // this.getHotListFromTab();
    },
    /**
     * 解决卡顿问题;等待 swiper 动画完成之后,获取数据
     */
    onSwiperEnd() {
      // 判断缓存是否有数据,不存在则重新获取数据
      if (!this.listData[this.currentIndex]) {
        this.getHotListFromTab();
        return;
      }
      // 未 return ,则证明存在缓存数据,即同时存在 height 的缓存数据
      this.currentSwiperHeight = this.swiperHeightData[this.currentIndex];
    }
};
</script>
问题: swiper 滚动时,tabs 无法产生联动
5-30:List 组件 - swiper 和 tabs 联动
目前状态:
tabs 切换时,swiper 可以联动。
swiper 切换时,tabs 无法联动。
解决:
让swiper 切换时,tabs 进行联动。
<template>
	<swiper
      class="swiper"
      :current="currentIndex"
      :style="{ height: currentSwiperHeight + 'px' }"
      @animationfinish="onSwiperEnd"
      @change="onSwiperChange"
    >
</template>
<script>
    export default {
    	methods: {
            // 监听 swiper 的切换事件
            onSwiperChange(e) {
              this.currentIndex = e.detail.current;
            },
        }
    }
</script>
5-31:List 组件 - tabs 中滑块跟随滚动
watch: {
        // 监听激活项目的变化
    defaultIndex: {
      handler(val) {
        this.activeIndex = val;
        // 定义滑块的位置
        this.tabToIndex();
      },
      // 该回调将会在侦听开始之后被立即调用
      immediate: true
    },

}

tabToIndex() {
      if (this.tabList.length === 0) return;
}
问题: tabs 吸顶
5-32:完成 tabs 的吸顶效果
<template>
	<!-- tabs -->
    <view class="tab-sticky">
      <my-tabs
        :tabData="tabData"
        :defaultIndex="currentIndex"
        :config="{ textColor: '#333333' }"
        @tabClick="tabClick"
      ></my-tabs>
    </view>
</template>

<style lang="scss" scoped>
  .tab-sticky {
    position: -webkit-sticky;
    position: sticky;
    z-index: 99;
    top: 0;
  }
}
</style>
5-33:控制列表滚动位置
// 当前的滚动距离
currentPageScrollTop: 0

/**
   * 监听页面的滚动
   */
  onPageScroll(res) {
    this.currentPageScrollTop = res.scrollTop;
  },

	// 监听 swiper 的切换事件
    onSwiperChange(e) {
      if (this.currentPageScrollTop > 130) {
        // 控制列表滚动位置
        uni.pageScrollTo({
          scrollTop: 130
        });
      }
      this.currentIndex = e.detail.current;
    },
5-34:List 组件 - 处理热度的显示
通过 filters 过滤器 进行处理:创建 filters 文件夹,创建 index.js 文件:
filters/index.js
/**
 * 将字符转化为以千为单位的字符
 * @param {*} val 待转换字符
 * @returns
 */
export function hotNumber(val) {
  const num = parseInt(val);
  if (num < 1000) return val;

  // 将 val 转为字符串
  val = val + '';
  // 获取以 千 为单位的值
  return val.substring(0, val.length - 3) + 'k';
}
main.js
import * as filters from './filters';

// 注册过滤器
Object.keys(filters).forEach((key) => {
  Vue.filter(key, filters[key]);
});
hot-list-item.vue
<text class="hot-text">{{ data.views | hotNumber }} 热度</text>
5-35:总结
- 首页内容完成
- 对
uniapp进行了基础的了解 - 创建
imooc-blog的项目 - 完成了
tabbar的搭建 - 了解了
.vue的单文件组件 - 分析了首页的模块组成
- 封装了
requestAPI请求模块 - 复杂组件
tabs tabs和 基于swiper的列表联动
- 对