目录
一.小程序的布局
1.1. flex是什么
1.2. flex布局
1.3.总体布局
二.轮播图
2.1. 组件
2.2. 数据请求
2.3. 页面
三.首页
2.1. 视图
2.2.数据
2.3. 样式
好啦今天就到这里了,希望能帮到你哦!!!
一.小程序的布局
1.1. flex是什么
flex布局:Flex是CSS中的一种布局模型,全称为Flexible Box,它用于设计网页布局。使用Flex布局,你可以更轻松地控制和调整容器中子元素的位置和大小,以实现响应式设计和更复杂的布局结构。
Flex程序设计:Flex(或Adobe Flex)是一种开发技术,用于构建富互联网应用程序(RIAs)。它允许开发者使用Adobe Flex框架和MXML(一种XML语言)来创建跨平台的富互联网应用程序。注意,Adobe Flex于2011年停止维护,后来开源并成为Apache Flex。
Flex工作制度:在某些情况下,"flex"可能指代一种灵活的工作安排,即弹性工作。这种工作安排允许员工更灵活地管理他们的工作时间和地点,通常通过远程工作或弹性工作时间来实现。
Flex语言:Flex也可以指代一种编程语言,特别是在数据交换和通信领域。这种语言通常用于创建XML文档,并与其他系统进行数据交换。
在小程序>微信小程序中,flex是一种布局方式,用于实现弹性盒子布局。通过使用flex布局,可以方便地实现页面元素的自适应和排列。flex布局主要通过设置父容器的flex属性来控制子元素的布局方式和占据空间的比例。具体来说,可以通过设置父容器的flex-direction属性来指定子元素的排列方向(水平或垂直),通过设置父容器的justify-content属性来指定子元素在主轴上的对齐方式,通过设置父容器的align-items属性来指定子元素在交叉轴上的对齐方式,通过设置子元素的flex属性来指定子元素占据父容器剩余空间的比例等。通过灵活运用flex布局,可以实现页面的自适应和灵活布局。
1.2. flex布局
在小程序>微信小程序中,flex布局是一种弹性盒子布局,用于实现页面元素的自适应和排列。通过使用flex布局,可以方便地控制页面元素在水平或垂直方向上的排列方式和占据空间的比例。
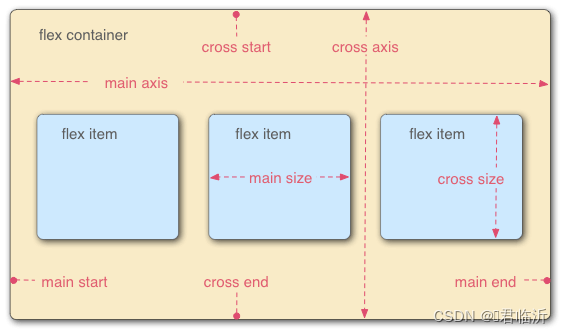
在小程序>微信小程序中,可以通过设置父容器的`display: flex`来启用flex布局。接下来,可以使用一系列的flex属性来控制子元素的布局方式:
- - `flex-direction`:指定子元素的排列方向,可以是`row`(水平方向),`column`(垂直方向),`row-reverse`(反向水平方向)或`column-reverse`(反向垂直方向)。
- - `justify-content`:指定子元素在主轴上的对齐方式,可以是`flex-start`(起始位置对齐),`flex-end`(结束位置对齐),`center`(居中对齐),`space-between`(两端对齐,子元素之间平均分布),`space-around`(子元素周围平均分布)等。
- - `align-items`:指定子元素在交叉轴上的对齐方式,可以是`flex-start`(起始位置对齐),`flex-end`(结束位置对齐),`center`(居中对齐),`baseline`(基线对齐)等。
- - `flex-wrap`:指定子元素是否换行,可以是`nowrap`(不换行),`wrap`(换行)或`wrap-reverse`(反向换行)。
- - `align-content`:指定多行子元素在交叉轴上的对齐方式,只有在有多行时才会生效,可以是`flex-start`(起始位置对齐),`flex-end`(结束位置对齐),`center`(居中对齐),`space-between`(两端对齐,行之间平均分布),`space-around`(行周围平均分布)等。
通过设置以上属性,可以实现页面元素的自适应和灵活排列,使页面在不同屏幕尺寸和设备上都能良好展示。
1.3.总体布局
小程序>微信小程序入门级及安装
https://blog.csdn.net/m0_74915426/article/details/133828417?spm=1001.2014.3001.5502
之后在项目中增加三个页面;
( 可以根据自己的需求进行更改命名 )
在项目的主体中找到 app.json 这个文件进行增加以上三个文件。
在该文件中找到 pages ,在里面进行直接页面。
  "pages":[
    "pages/index/index",
    "pages/meeting/list/list",
    "pages/vote/list/list",
    "pages/ucenter/index/index",
    "pages/logs/logs"
  ],
在进行一级页面的布局,在项目的主体中找到 app.json ,进行编写
  "tabBar": {
    "list": [{
      "pagePath": "pages/index/index",
      "text": "首页",
      "iconPath": "/static/tabBar/coding.png",
      "selectedIconPath": "/static/tabBar/coding-active.png"
    },
      {
        "pagePath": "pages/meeting/list/list",
        "iconPath": "/static/tabBar/sdk.png",
        "selectedIconPath": "/static/tabBar/sdk-active.png",
        "text": "会议"
      },
      {
        "pagePath": "pages/vote/list/list",
        "iconPath": "/static/tabBar/template.png",
        "selectedIconPath": "/static/tabBar/template-active.png",
        "text": "投票"
      },
      {
        "pagePath": "pages/ucenter/index/index",
        "iconPath": "/static/tabBar/component.png",
        "selectedIconPath": "/static/tabBar/component-active.png",
        "text": "设置"
      }]
  },
在项目的本地路径中,创建一个静态资源文件夹 ( static )
在静态资源文件夹 ( static )中创建一个放首页轮播图图片的文件夹 : tabBar
至于什么样的图片 : 可以自己在本地路径中进行增加 。
pagePath : 填写页面的地址
iconPath : 存放未选中的图片
selectedIconPath : 存放已选中的图片
text : 填写标题
二.轮播图
2.1. 组件
打开调试器,在调试器中选中Mock,点击加号,进行增加一个API信息,如图 :
API的信息,如图填写即可 :

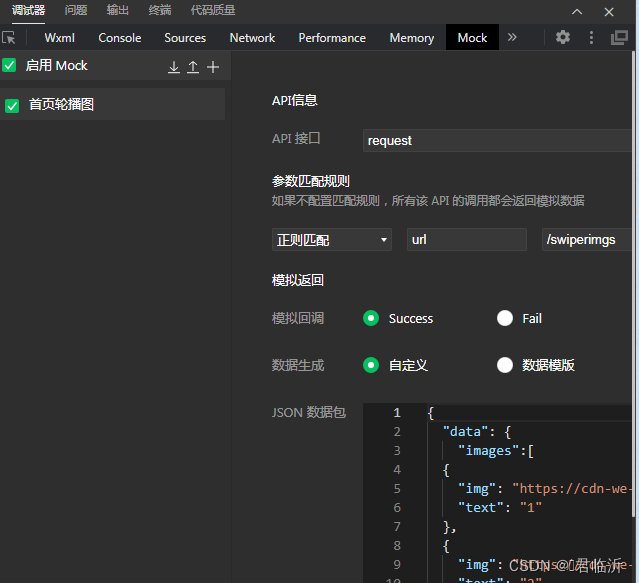
JSON的数据包在上图中右下角以下代码放入其中
{
"data": {
"images":[
{
"img": "https://cdn-we-retail.ym.tencent.com/tsr/home/v2/banner1.png",
"text": "1"
},
{
"img": "https://cdn-we-retail.ym.tencent.com/tsr/home/v2/banner2.png",
"text": "2"
},
{
"img": "https://cdn-we-retail.ym.tencent.com/tsr/home/v2/banner3.png",
"text": "3"
},
{
"img": "https://cdn-we-retail.ym.tencent.com/tsr/home/v2/banner4.png",
"text": "4"
},
{
"img": "https://cdn-we-retail.ym.tencent.com/tsr/home/v2/banner5.png",
"text": "5"
},
{
"img": "https://cdn-we-retail.ym.tencent.com/tsr/home/v2/banner6.png",
"text": "6"
}
]
},
"statusCode": "200",
"header": {
"content-type":"applicaiton/json;charset=utf-8"
}
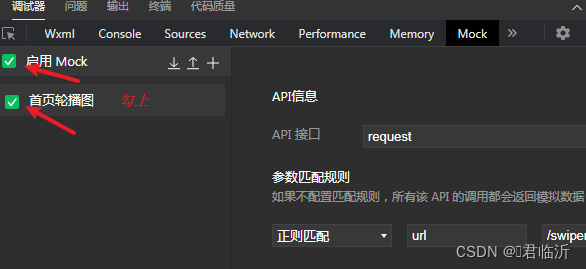
}然后选择勾选进行使用,如图:
2.2. 数据请求
在项目的本地路径中,创建一个资源文件夹 ( config)
在去开发工具中,在中共文件夹中创建一个 app.js 文件,进行代码编写 :
// 以下是业务服务器API地址
 // 本机开发API地址
 var WxApiRoot = 'http://localhost:8080/demo/wx/';
 // 测试环境部署api地址
 // var WxApiRoot = 'http://192.168.0.101:8070/demo/wx/';
 // 线上平台api地址
 //var WxApiRoot = 'https://www.oa-mini.com/demo/wx/';

 module.exports = {
   IndexUrl: WxApiRoot + 'home/index', //首页数据接口
   SwiperImgs: WxApiRoot+'swiperImgs', //轮播图
   MettingInfos: WxApiRoot+'meeting/list', //会议信息
 };
2.3. 页面
在 index.css 编写样式
page{
height: 100%;
background-color: #efeff4;
}
将 index.wxml 中的代码全部修改为一下代码:
<!--index.wxml-->
<view>
    <swiper autoplay="true" indicator-dots="true" indicator-color="#fff" indicator-active-color="#00f">
        <block wx:for="{{imgSrcs}}" wx:key="text">
            <swiper-item>
                <view>
                    <image src="{{item.img}}" class="swiper-item" />
                </view>
            </swiper-item>
        </block>
    </swiper>
</view>
在 index.css 增加以下样式
.swiper-item {
    height: 300rpx;
    width: 100%;
    border-radius: 10rpx;
}
在 index.js 中将全部代码修改为以下代码 :
// index.js
// 获取应用实例
const app = getApp()
const api = require("../../config/app")
Page({
data: {
},
// 事件处理函数
loadSwiperImgs(){
let that=this;
wx.request({
url: api.SwiperImgs,
dataType: 'json',
success(res) {
console.log(res)
that.setData({
imgSrcs:res.data.images
})
}
})
},
onLoad() {
if (wx.getUserProfile) {
this.setData({
canIUseGetUserProfile: true
})
}
this.loadSwiperImgs();
},
getUserProfile(e) {
// 推荐使用wx.getUserProfile获取用户信息,开发者每次通过该接口获取用户个人信息均需用户确认,开发者妥善保管用户快速填写的头像昵称,避免重复弹窗
wx.getUserProfile({
desc: '展示用户信息', // 声明获取用户个人信息后的用途,后续会展示在弹窗中,请谨慎填写
success: (res) => {
console.log(res)
this.setData({
userInfo: res.userInfo,
hasUserInfo: true
})
}
})
},
getUserInfo(e) {
// 不推荐使用getUserInfo获取用户信息,预计自2021年4月13日起,getUserInfo将不再弹出弹窗,并直接返回匿名的用户个人信息
console.log(e)
this.setData({
userInfo: e.detail.userInfo,
hasUserInfo: true
})
}
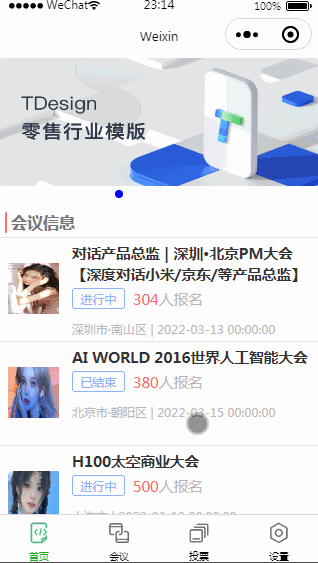
})效果图在后面一起
三.首页
在静态资源文件夹 ( static ) 中创建一个放首页会议用户头像图片的文件夹 : persons
需要怎样的头像图片,需要自行增加到其中。
注 : 需要在项目的本地路径下进行创建和增加
2.1. 视图
找到 index.wxml 将所有代码修改为以下代码 :
<!--index.wxml-->
<view>
    <swiper autoplay="true" indicator-dots="true" indicator-color="#fff" indicator-active-color="#00f">
        <block wx:for="{{imgSrcs}}" wx:key="text">
            <swiper-item>
                <view>
                    <image src="{{item.img}}" class="swiper-item" />
                </view>
            </swiper-item>
        </block>
    </swiper>
</view>
<view class="mobi-title">
    <text class="mobi-icon"></text>
    <text>会议信息</text>
</view>
<block wx:for-items="{{lists}}" wx:for-item="item" wx:key="item.id">
    <view class="list" data-id="{{item.id}}">
        <view class="list-img">
            <image class="video-img" mode="scaleToFill" src="{{item.image}}"></image>
        </view>
        <view class="list-detail">
            <view class="list-title"><text>{{item.title}}</text></view>
            <view class="list-tag">
                <view class="state">{{item.state}}</view>
                <view class="join"><text class="list-num">{{item.num}} </text> 人报名</view>
            </view>
            <view class="list-info"><text>{{item.location}}</text> | <text>{{item.starttime}}</text></view>
        </view>
    </view>
</block>
<view class="section bottom-line">
		<text>到底啦</text>
</view>
2.2.数据
找到 index.js 将所有代码修改为以下代码 :
// index.js
// 获取应用实例
const app = getApp()
const api = require("../../config/app")
Page({
  //初始化数据
  data: {
    "lists": [
      {
        "id": "1",
        "image": "/static/persons/8.jpg",
        "title": "对话产品总监 | 深圳·北京PM大会 【深度对话小米/京东/等产品总监】",
        "num":"304",
        "state":"进行中",
        "starttime": "2022-03-13 00:00:00",
        "location": "深圳市·南山区"
      },
      {
        "id": "1",
        "image": "/static/persons/1.png",
        "title": "AI WORLD 2016世界人工智能大会",
        "num":"380",
        "state":"已结束",
        "starttime": "2022-03-15 00:00:00",
        "location": "北京市·朝阳区"
      },
      {
        "id": "1",
        "image": "/static/persons/2.jpg",
        "title": "H100太空商业大会",
        "num":"500",
        "state":"进行中",
        "starttime": "2022-03-13 00:00:00",
        "location": "大连市"
      },
      {
        "id": "1",
        "image": "/static/persons/3.jpg",
        "title": "报名年度盛事,大咖云集!2016凤凰国际论坛邀您“与世界对话”",
        "num":"150",
        "state":"已结束",
        "starttime": "2022-03-13 00:00:00",
        "location": "北京市·朝阳区"
      },
      {
        "id": "1",
        "image": "/static/persons/4.jpg",
        "title": "新质生活 · 品质时代 2016消费升级创新大会",
        "num":"217",
        "state":"进行中",
        "starttime": "2022-03-13 00:00:00",
        "location": "北京市·朝阳区"
      }
    ]
  },"statusCode": "200",
  "header": {
    "content-type":"applicaiton/json;charset=utf-8"
  },
  // 事件处理函数
  // 获取轮播图的方法
  loadSwiperImgs(){
    let that=this;
    wx.request({
        url: api.SwiperImgs,
        dataType: 'json',
        success(res) {
          console.log(res)
          that.setData({
              imgSrcs:res.data.images
          })
        }
      })
  },
//  获取首页会议信息的方法
  loadMeetingInfos(){
    let that=this;
    wx.request({
        url: api.MettingInfos,
        dataType: 'json',
        success(res) {
          console.log(res)
          that.setData({
              lists:res.data.lists
          })
        }
      })
  },
  onLoad() {
    if (wx.getUserProfile) {
      this.setData({
        canIUseGetUserProfile: true
      })
    }
    this.loadSwiperImgs();
  },
  getUserProfile(e) {
    // 推荐使用wx.getUserProfile获取用户信息,开发者每次通过该接口获取用户个人信息均需用户确认,开发者妥善保管用户快速填写的头像昵称,避免重复弹窗
    wx.getUserProfile({
      desc: '展示用户信息', // 声明获取用户个人信息后的用途,后续会展示在弹窗中,请谨慎填写
      success: (res) => {
        console.log(res)
        this.setData({
          userInfo: res.userInfo,
          hasUserInfo: true
        })
      }
    })
  },
  getUserInfo(e) {
    // 不推荐使用getUserInfo获取用户信息,预计自2021年4月13日起,getUserInfo将不再弹出弹窗,并直接返回匿名的用户个人信息
    console.log(e)
    this.setData({
      userInfo: e.detail.userInfo,
      hasUserInfo: true
    })
  }
})
2.3. 样式
在 index.wxss 中编写样式,进行美化页面,以下是样式的所有代码 :
/**index.wxss**/
.swiper-item {
  height: 300rpx;
  width: 100%;
  border-radius: 10rpx;
}
.mobi-title {
  font-size: 12pt;
  color: #777;
  line-height: 110%;
  font-weight: bold;
  width: 100%;
  padding: 15rpx;
  background-color: #f3f3f3;
}

.mobi-icon {
  padding: 0rpx 3rpx;
  border-radius: 3rpx;
  background-color: #ff7777;
  position: relative;
  margin-right: 10rpx;
}

/*list*/
.list {
  display: flex;
  flex-direction: row;
  width: 100%;
  padding: 0 20rpx 0 0;
  border-top: 1px solid #eeeeee;
  background-color: #fff;
  margin-bottom: 5rpx;
  /* border-radius: 20rpx;
  box-shadow: 0px 0px 10px 6px rgba(0,0,0,0.1); */
}

.list-img {
  display: flex;
  margin: 10rpx 10rpx;
  width: 150rpx;
  height: 220rpx;
  justify-content: center;
  align-items: center;
}

.list-img .video-img {
  width: 120rpx;
  height: 120rpx;

}

.list-detail {
  margin: 10rpx 10rpx;
  display: flex;
  flex-direction: column;
  width: 600rpx;
  height: 220rpx;
}

.list-title text {
  font-size: 11pt;
  color: #333;
  font-weight: bold;
}

.list-detail .list-tag {
  display: flex;
  height: 70rpx;
}

.list-tag .state {
  font-size: 9pt;
  color: #81aaf7;
  width: 120rpx;
  border: 1px solid #93b9ff;
  border-radius: 2px;
  margin: 10rpx 0rpx;
  display: flex;
  justify-content: center;
  align-items: center;
}

.list-tag .join {
  font-size: 11pt;
  color: #bbb;
  margin-left: 20rpx;
  display: flex;
  justify-content: center;
  align-items: center;
}

.list-tag .list-num {
  font-size: 11pt;
  color: #ff6666;
}

.list-info {
  font-size: 9pt;
  color: #bbb;
  margin-top: 20rpx;
}
.bottom-line{
  display: flex;
  height: 60rpx;
  justify-content: center;
  align-items: center;
  background-color: #f3f3f3;
}
.bottom-line text{
  font-size: 9pt;
  color: #666;
}
模拟器效果: